How to install Laravel applications on a hosting with ispmanager
Disclaimer: I'm not a PHP or Laravel guru. But in this article, I will use specific examples to show how to deploy a web application based on the Laravel framework on a website under the control of ispmanager. There will be little theory, but lots of practical steps, command line, screenshots, a bit of docker and some code compilation.
Ready? Here we go!
Getting Started
First, let's start with the composer component, which is absolutely necessary for us. The ispmanager panel supports installation on different operating systems, so the version of composer, depending on your operating system, may be 1.x or 2.x. Modern Laravel applications require at least version 2.x of composer.
When you start installing your first Laravel application, you might see an error like this:
bash-4.2$ composer create-project --prefer-dist laravel/laravel .
Creating a "laravel/laravel" project at "./laravel"
Deprecation Notice: preg_match(): Passing null to parameter #2 ($subject) of type string is deprecated in /usr/share/php
/Composer/Command/CreateProjectCommand.php:329
Deprecation Notice: preg_replace(): Passing null to parameter #3 ($subject) of type array|string is deprecated in /usr/s
hare/php/Composer/Semver/VersionParser.php:53
Warning from https://repo.packagist.org: Support for Composer 1 is deprecated and some packages will not be available.
You should upgrade to Composer 2. See https://blog.packagist.com/deprecating-composer-1-support/
Info from https://repo.packagist.org: Killed
This means that you have an outdated version of composer 1.x installed on your operating system, and the application is telling you that you should update it.
For example, this happens on CentOS 7. But on Debian 11, where I conducted all my experiments, composer 2.x is installed by default.
You can check the version using:
bash-4.2$ composer -v
   ______
  / ____/___  ____ ___  ____  ____  ________  _____
 / /   / __ \/ __ `__ \/ __ \/ __ \/ ___/ _ \/ ___/
/ /___/ /_/ / / / / / / /_/ / /_/ (__  )  __/ /
\____/\____/_/ /_/ /_/ .___/\____/____/\___/_/
                    /_/
Composer version 1.10.26 2022-04-13 16:39:56
An attempt to update it in a simple way ends up with the following error message:
	bash-4.2$ composer self-update --2

  [Symfony\Component\Console\Exception\CommandNotFoundException]
  Command "self-update" is not defined.
So let's update it to version 2.x in another, safer way.
First, we find out the location of composer so that we can add it later when updating as an option --install-dir /usr/bin --filename composer in the third command:
	bash-4.2$ which composer
/usr/bin/composer
And then update the composer as the root user as follows:
	# php -r "copy('https://getcomposer.org/installer', 'composer-setup.php');"
# php -r "if (hash_file('sha384', 'composer-setup.php') === '55ce33d7678c5a611085589f1f3ddf8b3c52d662cd01d4ba75c0ee0459970c2200a51f492d557530c71c15d8dba01eae') { echo 'Installer verified'; } else { echo 'Installer corrupt'; unlink('composer-setup.php'); } echo PHP_EOL;"
Installer verified
# php composer-setup.php --install-dir /usr/bin --filename composer
All settings correct for using Composer
Downloading...
Composer (version 2.2.21) successfully installed to: /usr/bin/composer
Use it: php /usr/bin/composer
# php -r "unlink('composer-setup.php');"
# composer -v
Do not run Composer as root/super user! See https://getcomposer.org/root for details
Continue as root/super user [yes]?
   ______
  / ____/___  ____ ___  ____  ____  ________  _____
 / /   / __ \/ __ `__ \/ __ \/ __ \/ ___/ _ \/ ___/
/ /___/ /_/ / / / / / / /_/ / /_/ (__  )  __/ /
\____/\____/_/ /_/ /_/ .___/\____/____/\___/_/
                    /_/
Composer version 2.2.21 2023-02-15 13:07:40
The next step of preparation is to install all the packages we might need in the future into the system:
# apt install git gcc make autoconf
Now it's time to go to the ispmanager panel and create a website and a database for it.
The most important thing here is to specify public manually at the end of the site directory path and turn on the PHP Handler settings, as shown in the screenshot:
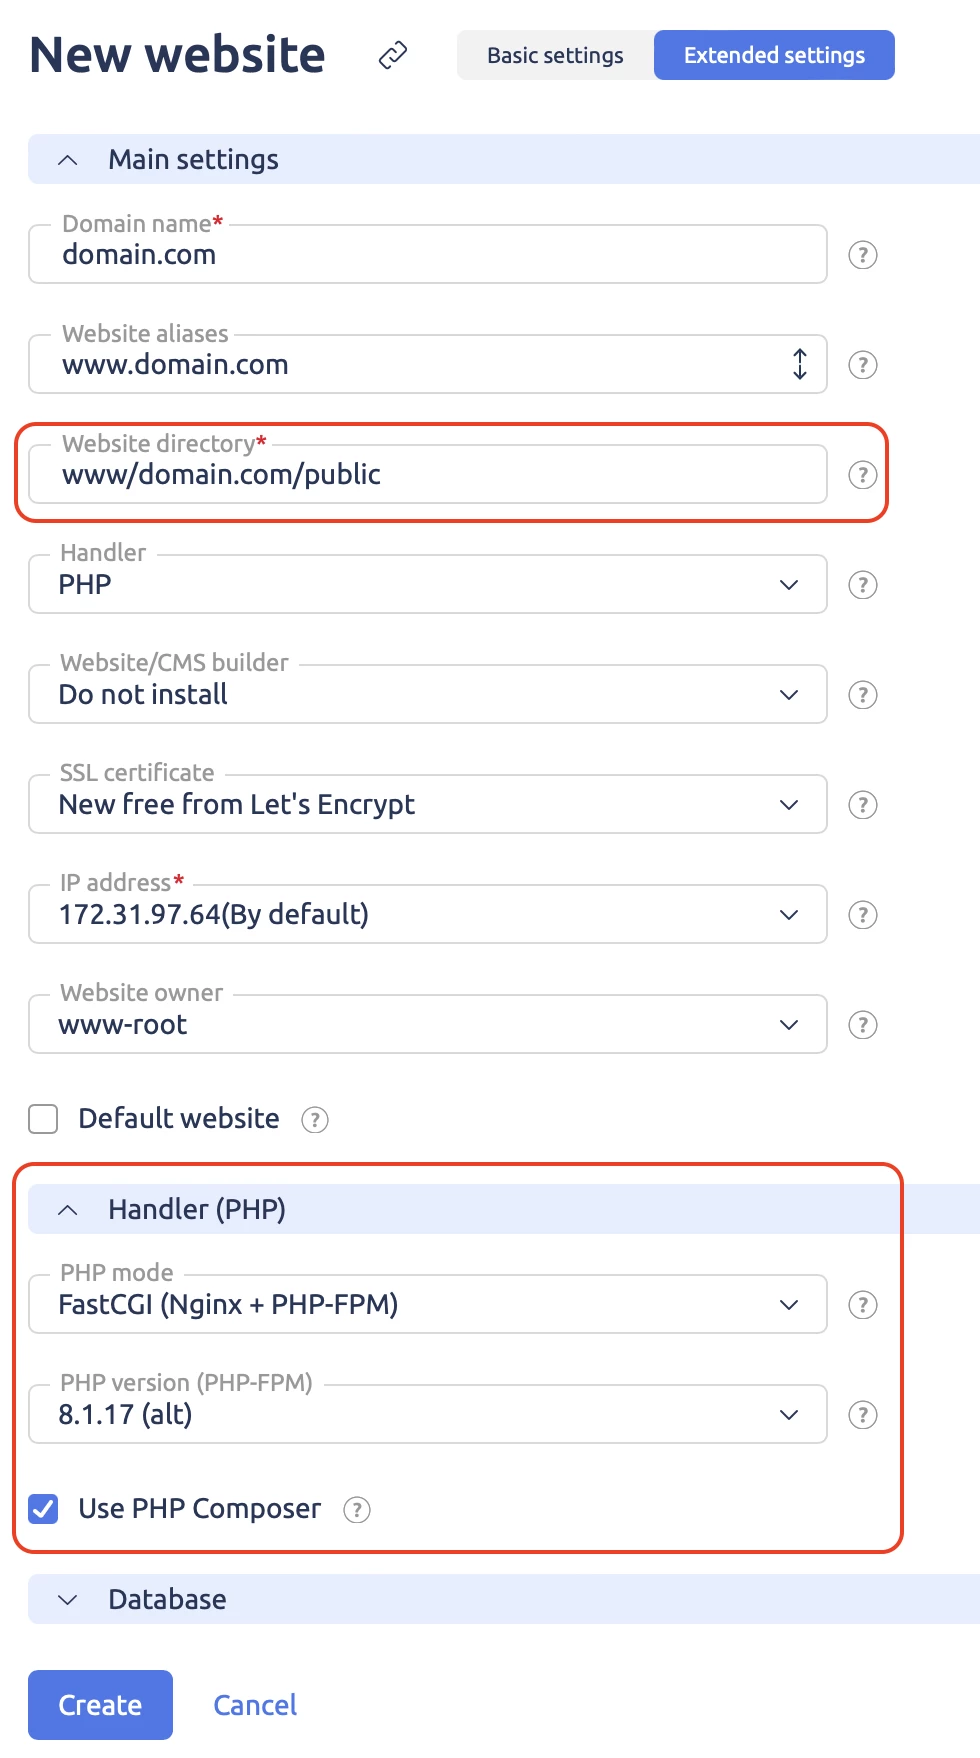
After creating the website, the most important step in preparation is to make a change in the nginx configuration file. Without this change, your Laravel site will not work. This change can be made in the ispmanager interface by highlighting the needed site and clicking the Configuration Files button in the menu. But I'll show you how to do it in the command line, since you'll have better control of the process there.
You need to open the nginx configuration file of your site You need to open the nginx configuration file of your site in any console file editor and add a line into it in the place indicated by the arrow:
location / {
                try_files $uri $uri/ /index.php?$query_string; # <----- add this string here!
                location ~ [^/]\.ph(p\d*|tml)$ {
                        try_files /does_not_exists @php;
                }
                location ~* ^.+\.(jpg|jpeg|gif|png|svg|js|css|mp3|ogg|mpe?g|avi|zip|gz|bz2?|rar|swf|webp|woff|woff2)$ {
                        expires 24h;
                }
After saving the file, check that there are no errors in the nginx configuration and restart nginx:
# nginx -t
# systemctl restart nginx
After creating the site, if you click on the Website Files button in the menu, you will get to that very public root directory, where the following files will be located:
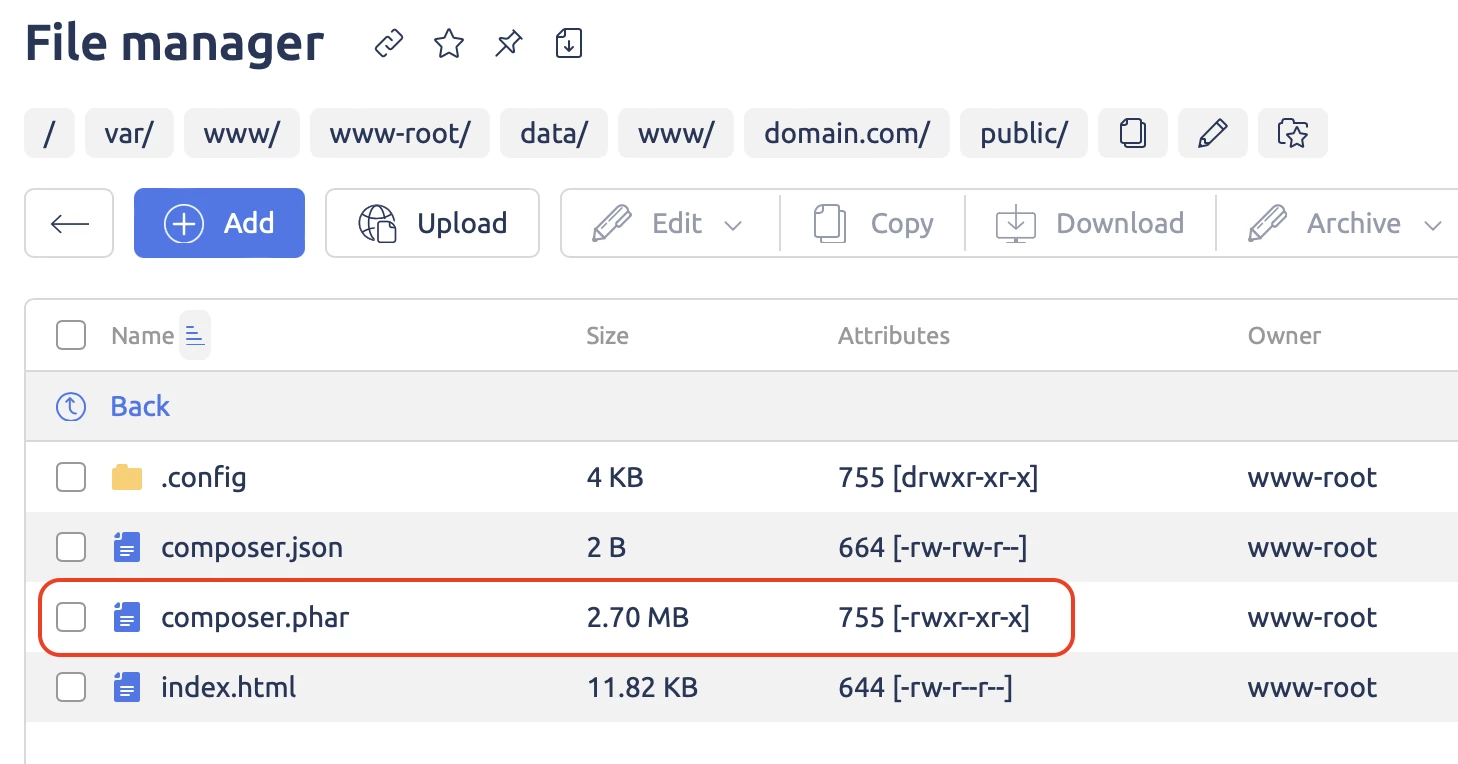
The selected composer.phar file must be copied or transferred above to the /var/www/www-root/data/www/ directory. We will need it in the future. You can also do this using the File Manager.
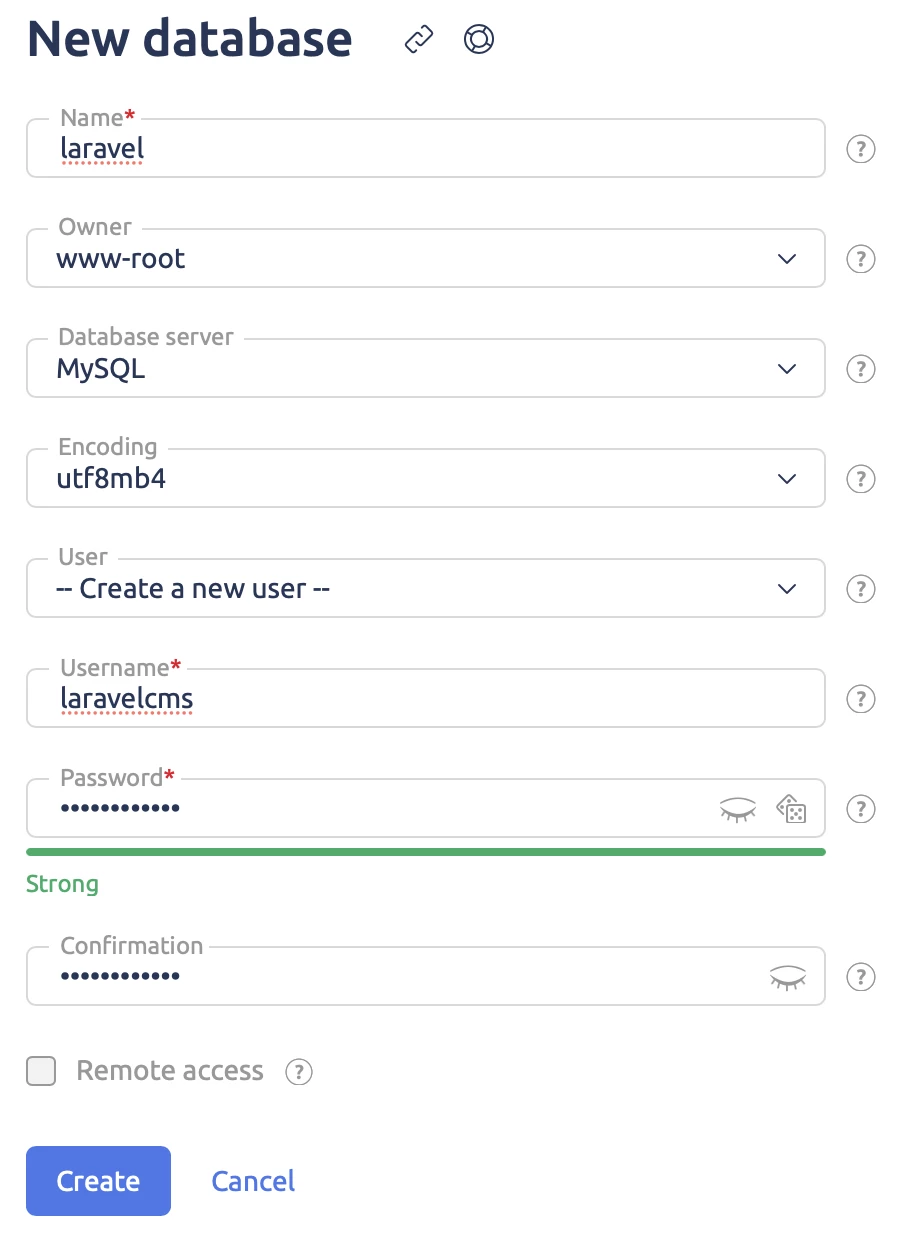
The database is created in the usual way (remember the name of the database, the login and the password for the database):
That's the end of the installation preparations. Now we can move on to the actual process of installing Laravel applications on our site.
Installing Laravel applications
The installation of applications itself is quite simple and of the same type. I'll show the example of one popular CMS and an online store. By analogy, you can install other Laravel applications.
Let’s start with PyroCMS.
The first thing we do is connect as a www-root user, go to the directory of the site where public is located, and delete absolutely everything in it. Even the public directory. When we install the application, this directory will be created again:
The first thing we do is connect as a www-root user, go to the directory of the site where public is located, and delete absolutely everything in it. Even the public directory. When we install the application, this directory will be created again:
	# su www-root
$ cd /var/www/www-root/data/www/domain.com/
$ rm -rf * .*
Now we have everything ready to install the application. We execute it with a couple of commands:
A small remark. When creating a website in the ispmanager interface, we chose the PHP 8.1.x version. So in the above command we use this version of PHP - /opt/php81/bin/php. If you use another version of PHP, use /opt/php82/bin/php or /opt/php74/bin/php respectively.
Next we need to do the initial configuration of our PyroCMS. This step creates the database structure, administrator account and other settings. We do this with the following command, answering the questions about the connection parameters of the created database and others:
$ /opt/php81/bin/php artisan install
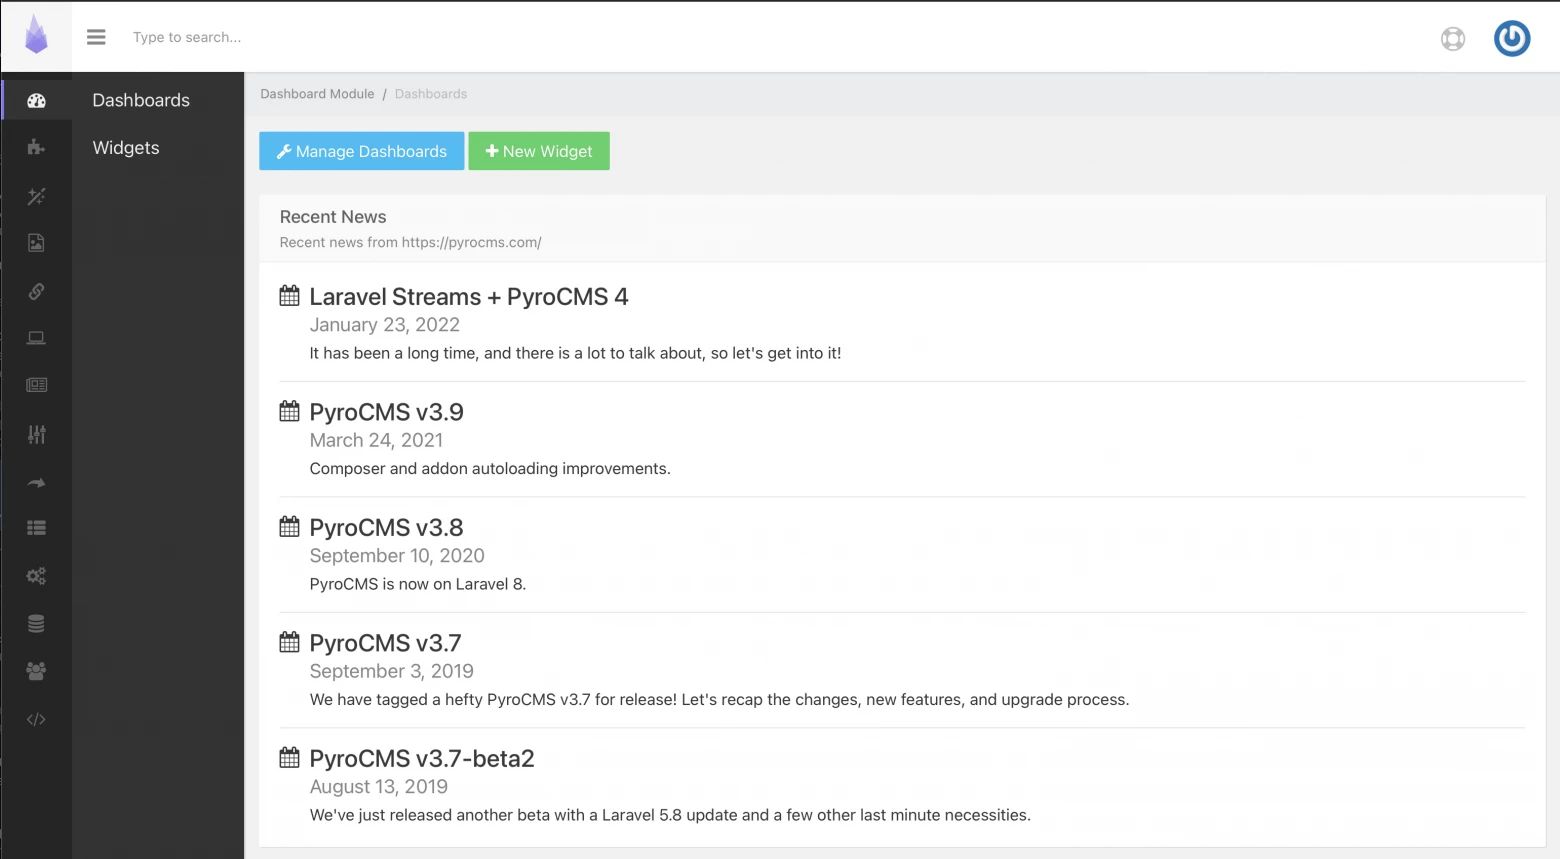
After a successful configuration we go to https://domain.com, log in as admin account and see something like this dashboard of our PyroCMS, where all the configuration is done:
The installation can be performed from the interface of ispmanager by running the Shell-client for the site. It will need to run the following commands in the directory
	/var/www/www-root/data/www/domain.com/:
$ rm -rf * .*
$ composer create-project --prefer-dist pyrocms/pyrocms .
$ composer update
$ php artisan install
More information on how to install PyroCMS can be found in the documentation on their website.
Now let's look at the installation of a platform for deploying an online store based on Aimeos.
In fact, all the same commands are used, except that the application configuration starts automatically immediately after the last command:
	$ cd /var/www/www-root/data/www/domain.com/
$ rm -rf * .*
$ /opt/php81/bin/php /var/www/www-root/data/www/composer.phar create-project aimeos/aimeos --prefer-dist /var/www/www-root/data/
www/domain.com/
After the configuration process is successfully completed, open your website in your favorite browser. You should see these beautiful pictures there:

ъ

But that’s not all yet!
If you look in the .env configuration file in the site directory, you can see that it mentions the ability to use Redis to speed up an already fast Laravel site even more:
				$ cd /var/www/www-root/data/www/domain.com/
$ cat .env | grep -i redis
REDIS_HOST=127.0.0.1
REDIS_PASSWORD=
REDIS_PORT=6379
Let's take a look at how we can use this feature within the ispmanager server.
First we need to start the Redis service on port 6379. Undoubtedly, this can be done by installing the Redis-service with the help of the package manager of the operating system - yum or apt. And this has its advantages. I will show you how you can do it with the new ispmanager feature: Docker support.Simply go to the Docker menu and create a Redis container:
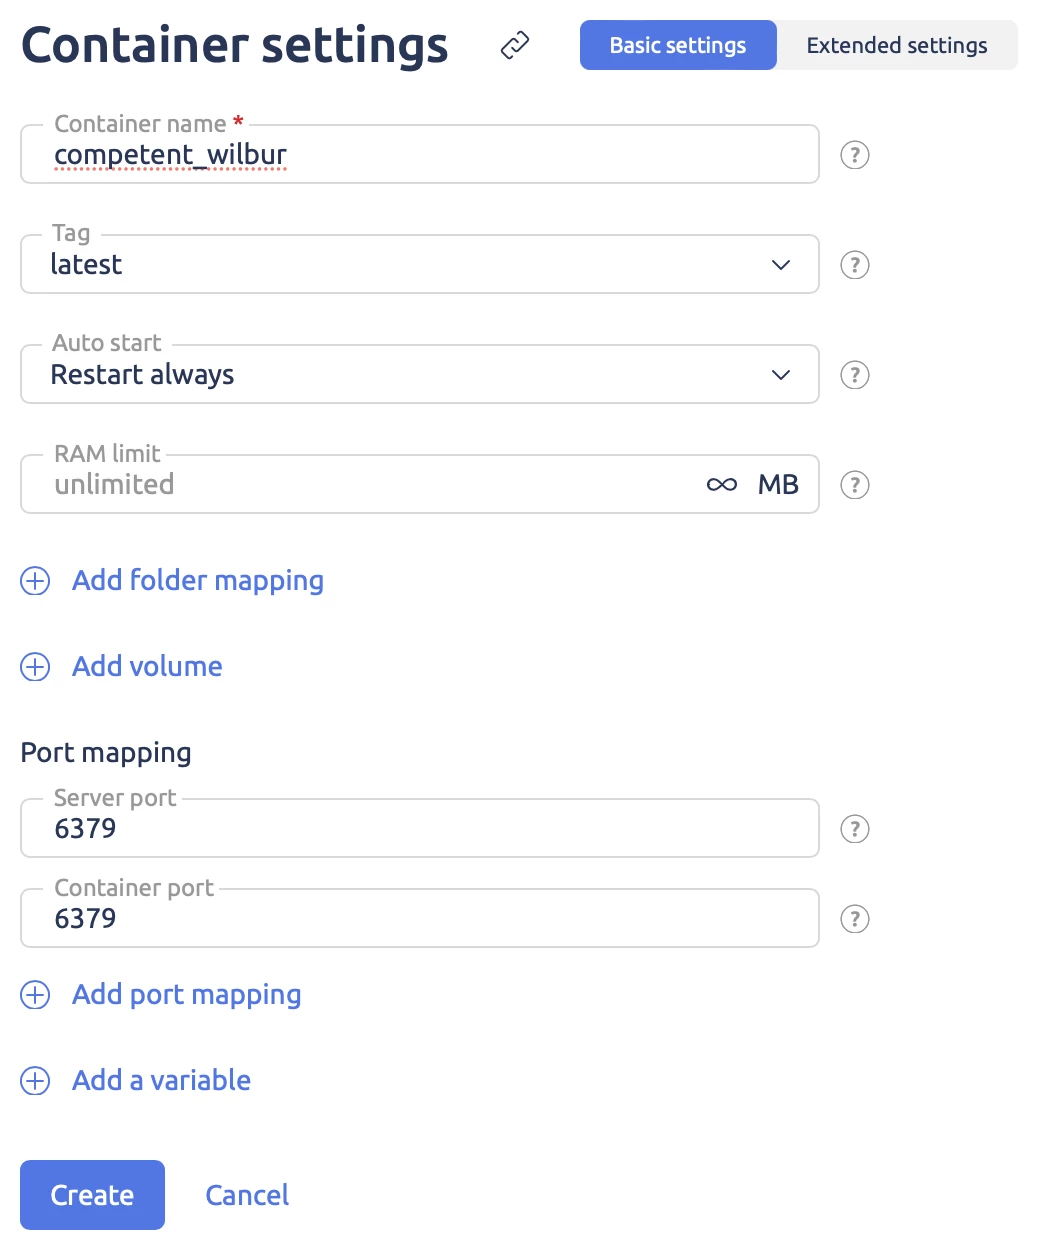
Once the container has been created and is running, check that the Redis service is running and the port is available:
			# docker ps
CONTAINER ID   IMAGE          COMMAND                  CREATED          STATUS          PORTS                    NAMES
3256bbd4fdec   redis:latest   "docker-entrypoint.s…"   46 seconds ago   Up 45 seconds   0.0.0.0:6379->6379/tcp   cranky_poincare
# lsof -i tcp:6379
COMMAND      PID USER   FD   TYPE DEVICE SIZE/OFF NODE NAME
docker-pr 179896 root    4u  IPv4 662904      0t0  TCP *:redis (LISTEN)
# docker exec -it 3256bbd4fdec redis-cli
127.0.0.1:6379> ping
PONG
127.0.0.1:6379>
Now we need to choose the way our Laravel application will communicate with the Redis server. The Laravel website says the following:
Before using Redis with Laravel, we recommend that you install and use the phpredis PHP extension via PECL. The extension is more difficult to install compared to the PHP packages of the user layer, but it can provide better performance for applications that use Redis intensively.
If you cannot install the phpredis extension, then install the predis/predis package via Composer. Predis is a Redis client written entirely in PHP and does not require additional extensions:
composer require predis/predis
We need better performance and therefore we will go the hard way – compile the PHP module for Redis from the most recent source code :) We have already installed all the system packages necessary for compilation by apt at the preparation stage.
So, our actions are as follows: download the source code, unpack, configure, compile and install the module for our version PHP 8.1.x in ispmanager. Now the same in commands:
# wget https://github.com/phpredis/phpredis/archive/5.3.7.zip -O phpredis.zip
# unzip -o ./phpredis.zip
# cd phpredis-5.3.7/
# /opt/php81/bin/phpize
# ./configure --with-php-config=/opt/php81/bin/php-config
# make
# make install
# echo 'extension=redis.so' > /opt/php81/etc/php.d/redis.ini
Check that the module is connected and working:
	# /opt/php81/bin/php -m | grep redis
redis
# /opt/php81/bin/php -i | grep redis
/opt/php81/etc/php.d/redis.ini
redis
redis.arrays.algorithm => no value => no value
redis.arrays.auth => no value => no value
redis.arrays.autorehash => 0 => 0
redis.arrays.connecttimeout => 0 => 0
redis.arrays.consistent => 0 => 0
redis.arrays.distributor => no value => no value
redis.arrays.functions => no value => no value
redis.arrays.hosts => no value => no value
redis.arrays.index => 0 => 0
redis.arrays.lazyconnect => 0 => 0
redis.arrays.names => no value => no value
........
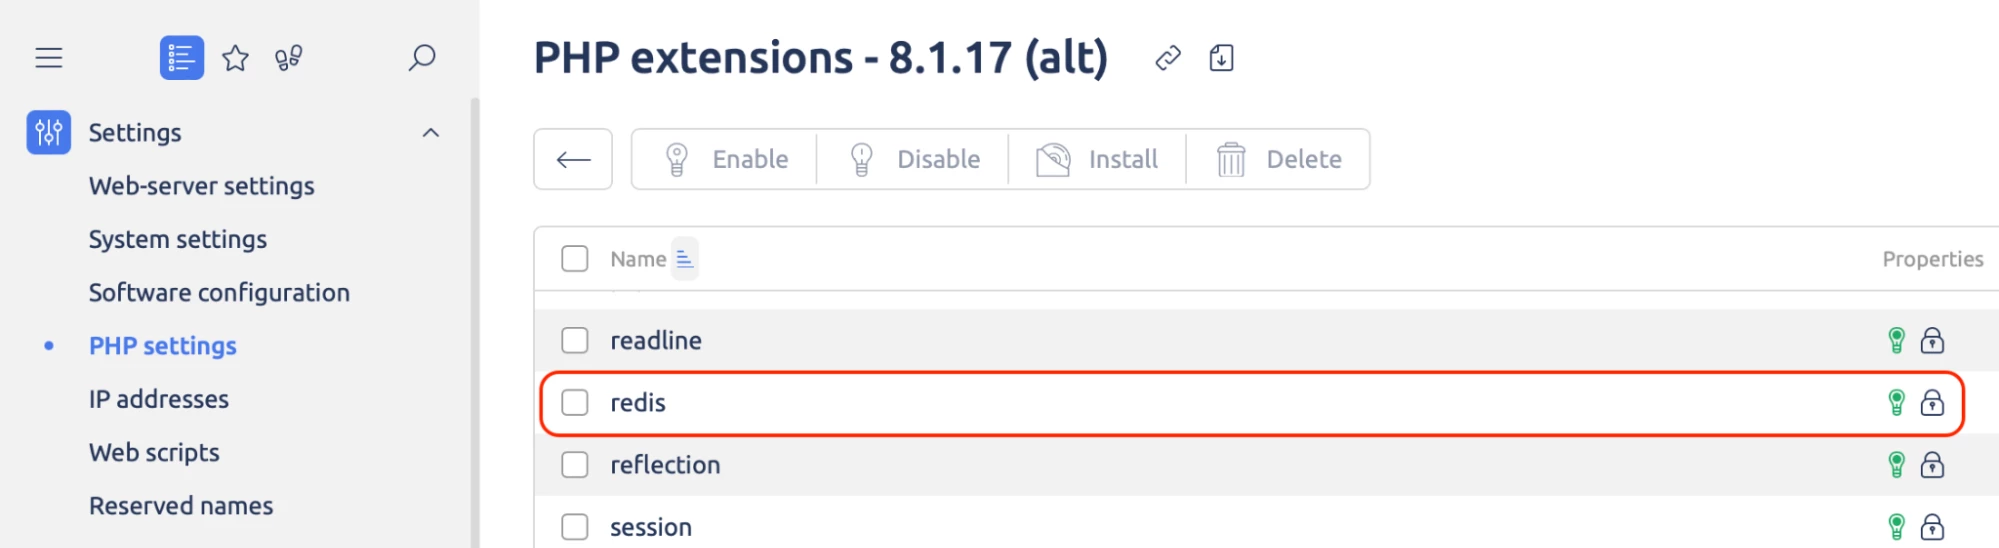
Let's make sure that the Redis module is also enabled in the ispmanager interface in the relevant PHP settings:
For those who are too lazy to bother with compiling the module manually, I can recommend using a simple command from the quote from the Laravel website above and installing the Laravel Predis extension. To do this, just run the composer require predis/predis inside var/www/www-root/data/www/domain.com/
To conclude
As a result of the above steps you get the fastest possible website with CMS or online store on the trendy Laravel framework running the popular hosting panel ispmanager. And at the same time you get experience in installation and configuration of such applications.
I did not specifically address the security issues of such a site and its services in the article, since this is a topic for a separate article, and this one turned out to be voluminous anyway :)