Add a WWW-domain
WWW domain (website) — a page or group of pages that are broadcast to the Internet and are available to users by URL. The appearance and content of the website are formed from its source files. When you add a WWW domain, a domain name is automatically created for it. Read more in Create a domain name.
To add a WWW domain to ispmanager, enter Domains → WWW-domains → Add button and specify the parameters.
Main settings
- Specify the domain Name — the name by which users will access the website. DetailsThe following string is added into the Nginx configuration file for the WWW-domain:
Nginx configuration file
The following string is added into the Apache configuration file for the WWW-domain:server_name <WWW-domain name>;Apache configuration file
ServerName <WWW-domain name> - Specify the domain Aliases — additional names for accessing the website. For example, www.example.com or wiki.example.com. By default, an alias "www." is entered after the domain name. Resource A-records are automatically created for aliases. Read more in Resource records .
DetailsThe following string is added into the Nginx configuration file for the WWW-domain:Nginx configuration file
aliases of the WWW-domain are added:server_name <WWW-domain name>;Nginx configuration file
The following string is added into the Apache configuration file for the WWW-domain:server_name <WWW-domain name> <WWW-domain aliases>;Apache configuration file
ServerAlias <WWW-domain aliases>; - Specify the website Root directory relative to the owner's home directory. Files of the website will be stored in this directory. DetailsLines are added to the Nginx configuration file for the WWW domain:
Nginx configuration file
A line is added to the Apache configuration file for the WWW domain:set $root_path <path to root directory>; root $root_path;Apache configuration file
DocumentRoot <path to root directory> - Select a content management system (CMS) in the Select a script field. CMS is used to fill the website with content (articles, photos, pages, etc.). Without a CMS, adding new content or changing existing content will require editing the website's source files. ispmanager supports CMS Drupal, Prestashop, WordPress, joomla, phpBB.
- Select the website Owner — an ispmanager user. DetailsA directory with the username is created in
/vhosts . The directory contains the Nginx configuration file.conf for the WWW-domain.A directory with the username is created in/conf/vhosts . The directory contains the Apache configuration file - Select an IP-addresses that will be assigned to the website. You can select an IP address from the list of IPs in Cluster settings → IP addresses. DetailsThe following string is added into the Nginx configuration file for the WWW-domain:
Nginx configuration file
The following string is added into the Apache configuration file for the WWW-domain:listen <IP address>:<port>;Apache configuration file
Port 80 is used per default for an insecure connection and port 443 is used for a secure one.<VirtualHost <IP address>:<port>> - Specify the Administrator email address — the email address that will be displayed on the web server error pages for this website. By default, after entering the domain name, the field specifies the mailbox webmaster@. DetailsThe following string is added into the Apache configuration file for the WWW-domain:
Apache configuration file
ServerAdmin <Administrator email> - Select the Encoding . Encoding defines the set of characters that are used to represent the data of the website:
- off — the default value for the database will be used;
- UTF-8 (recommended) — includes all characters of the Unicode standard, including Cyrillic. DetailsThe following string is added into the Nginx configuration file for the WWW-domain:
Nginx configuration file
The following string is added into the Apache configuration file for the WWW-domain:charset <encoding>;Apache configuration file
AddDefaultCharset <encoding>NoteTo modify a list of encodings create the /usr/local/mgr5/etc/charset file and enter the required values.
- Specify the Index page of the website. This page opens for the user who goes to the website by domain name and does not specify a particular page. For example, in case of request www.example.com , instead of www.example.com/index.php. Multiple pages can be listed in order of importance, separated by a space. If the first specified page does not exist, the second page will be checked and so on. If you do not specify index pages, the control panel will use values from the global web server settings. DetailsThe following string is added into the Nginx configuration file for the WWW-domain:
Nginx configuration file
The following string is added into the Apache configuration file for the WWW-domain:index <index pages>;Apache configuration file
DirectoryIndex <index pages> - To secure data transmitted between the user's browser and the site:
- Enable the Secure connection (SSL) option. You will need to install an SSL certificate on the website. DetailsThe second section server is created in the Nginx configuration file of the WWW-domain. The section contains the following strings:
Nginx configuration file
The second section server is created in the Apache configuration file of the WWW-domain. The section contains the following strings:ssl_certificate "/var/www/httpd-cert/www-root/<WWW-domain name>.crt"; ssl_certificate_key "/var/www/httpd-cert/www-root/<WWW-domain name>.key"; ssl_ciphers EECDH:+AES256:-3DES:RSA+AES:!NULL:!RC4; ssl_prefer_server_ciphers on; ssl_protocols TLSv1 TLSv1.1 TLSv1.2; ssl_dhparam /etc/ssl/certs/dhparam4096.pem listen [<IP address>]:<port> ssl http2;Apache configuration file
SSLEngine on SSLCertificateFile "/var/www/httpd-cert/www-root/<WWW-domain name>.crt" SSLCertificateKeyFile "/var/www/httpd-cert/www-root/<WWW-domain name>.key" SSLHonorCipherOrder on SSLProtocol +TLSv1 +TLSv1.1 +TLSv1.2 SSLCipherSuite EECDH:+AES256:-3DES:RSA+AES:!NULL:!RC4 - Configure the secure connection settings:
- To force a secure HTTPS connection when connecting to the website, enable the HSTS option. The option is available if an SSL certificate is connected to the website. Redirection works if the user's browser has already connected to the website through a secure connection and has saved the connection parameters. When redirecting, the server returns a response code "301 Moved Permanently". DetailsThe following string is added into the Nginx configuration file for the WWW-domain:
Nginx configuration file
The following strings are added into the Apache configuration file for the WWW-domain:add_header Strict-Transport-Security "max-age=31536000;"Apache configuration file
<IfModule headers_module> Header always set Strict-Transport-Security "max-age=31536000; preload" </IfModule> - To force a secure HTTPS connection when trying to open a website using the HTTP protocol, enable the Redirect HTTP-requests to HTTPS option. The option is available if an SSL certificate is connected to the website. When redirecting, the server returns a response code "301 Moved Permanently". DetailsThe following string is added into the Nginx configuration file for the WWW-domain:
Nginx configuration file
The following strings are added into the Apache configuration file for the WWW-domain:return 301 https://$host:443$request_uriApache configuration file
RewriteEngine on RewriteCond %{HTTPS} off RewriteRule (.*) https://%{HTTP_HOST}%{REQUEST_URI} [R,L] - Change the SSL port for HTTPS connections if necessary. The default value is 443. DetailsThe port is specified in the Nginx configuration file of the WWW-domain:
Nginx configuration file
and in the Apache configuration file of the WWW-domain:listen [<IP address>]:<port> ssl http2;Apache configuration file
<VirtualHost <IP address>:<port>> - Select an SSL certificate that encrypts information transmitted between a user browser and a website.
- New self-signed — a free self-signed SSL certificate that is not trusted by browsers. When you open a website with a self-signed certificate, the browser will display a security alert.
- Let's Encrypt certificate — a free trusted SSL certificate.
- To force a secure HTTPS connection when connecting to the website, enable the HSTS option. The option is available if an SSL certificate is connected to the website. Redirection works if the user's browser has already connected to the website through a secure connection and has saved the connection parameters. When redirecting, the server returns a response code "301 Moved Permanently".
- Enable the Secure connection (SSL) option. You will need to install an SSL certificate on the website.
- Enable the Nginx-proxy option to redirect requests to user applications (such as phpMyAdmin, phpPGAdmin, Roundcube). Enter the following parameters:NoteBefore you start, you need to install an SSL certificate.
- Enter the Nginx-proxy IP-address from the list in Cluster settings → IP-addresses.
- To open ispmanager when redirecting, enable the Proxy requests to panel option. If the option is disabled, the redirect will open the site content by domain name.
- For the server to be able to process SSI commands, enable the SSI option. SSI (Server Side Includes) is a programming language for dynamic page building on the server before displaying them. DetailsThe following string is added into the Nginx configuration file for the WWW-domain:
Nginx configuration file
The following string is added into the Apache configuration file for the WWW-domain:ssi on;Apache configuration file
Options +Includes - If necessary, enable the Priority option. This option is used if several websites are assigned to the same IP address and a user requests a website using an IP address or domain name that is not registered on the server with ispmanager. In this case, the control panel will open the priority website. If this option is not specified for any website, the control panel will open the website whose domain name is the first alphabetically. The punycode encoding will be used to compare Cyrillic domain names. DetailsThe following string in the Nginx configuration file for the WWW-domain
Nginx configuration file
will be changed intolisten <IP-address>:<port>;Apache configuration file
Inlisten <IP-address>:<port> default;/conf/vhosts-default/ a symlink to the Apache configuration file for the WWW-domain is created.NoteOnly one Priority website can correspond to each IP address. If this option was previously enabled for a different domain, that site will no longer be a priority. - If necessary, enable the Assign to technical domain option. If this option is enabled, the site will open when requested by the address of the technical domain. Only one user site can be linked to a technical domain at a time.
- Specify an arbitrary Comment for the WWW domain. It will be displayed in the WWW domain list in the Comment column.
- If necessary, Enable DDoS protection. The protection completely blocks access to the server for IP addresses from which a large number of requests come. Read more in DDoS protection.

Additional features
- Choose how to create Autosubdomains : DetailsThe option to create Autosubdomains is available if the Priority option is disabled. The function allows you to automatically create subdomains without changing the configuration. The use of autosubdomains relieves you from additional operations. Subdomains are automatically added when subdirectories are created in the root directory of the website.
- off — do not create subdomains;
- in a separate directory — subdomain files should be created in subdirectories /var/www/www-root/data/www/ with the name of the subdomain. For example, for the subdomain www.test.example.com with the root directory of /var/www/www-root/data/www/example.com subdomain files need to be created in /var/www/www-root/data/www/test.example.com; DetailsThe following strings are added into the Nginx configuration file for the WWW-domain:
Nginx configuration file
The following string is added into the Apache configuration file for the WWW-domain:set $root_path /var/www/www-root/data/www; set $subdomain <WWW-domain name>; if ($host ~* ^((.*).<WWW-domain name>)$) { set $subdomain $1; } root $root_path/$subdomain;Apache configuration file
VirtualDocumentRoot /var/www/www-root/data/www/%0 - in the domain's subdirectory — subdomain files must be created in subdirectories of the root directory of the website. For example, for the subdomain www.test.example.com with the root directory of /var/www/www-root/data/www/example.com subdomain files need to be created in /var/www/www-root/data/www/example.com/test . DetailsThe following strings are added into the Nginx configuration file for the WWW-domain:
Nginx configuration file
The following string is added into the Apache configuration file for the WWW-domain:set $root_path /var/www/www-root/data/www/<WWW-domain name>; set $subdomain ""; if ($host ~* ^((.*).<WWW-domain name>)$) { set $subdomain $2; } root $root_path/$subdomain;Apache configuration file
VirtualDocumentRoot /var/www/www-root/data/www/<WWW-domain name>/%1NoteIf you select the method of creating autosubdomains "in a separate directory" or "in the domain's subdirectory", the value "*." is added to the Aliases field.
NoteYou can select Auto-subdomains provided that the Default option is disabled for the domain. - To enable support of PHP scripts for the website:
- Enable the PHP option.
- Select a PHP mode :
- Apache module — dynamic content is processed by the PHP module of the Apache web server;
- CGI — dynamic content is processed by Apache in CGI mode;
- FastCGI (Apache) — dynamic content is processed by Apache in FastCGI mode;
- FastCGI (Nginx + PHP-FPM) — PHP-FPM processes dynamic content.
- Select whether to Use open_basedir for the Apache module mode of PHP:
- option enabled — PHP scripts have access only to the root directory of the website;
- option disabled — PHP scripts have access to all server directories.
- Select a PHP (CGI) version for "CGI" and "FastCGI (Apache)".
- To enable CGI-scripts for the website select the CGI-scripts checkbox and File extensions for the CGI-scripts. DetailsThe following strings is added into the Nginx configuration file for the WWW-domain:
Nginx configuration file
The following string is added into the Apache configuration file for the WWW-domain:location / { location ~* ^.+\.(jpg|jpeg|gif|png|svg|js|css|mp3|ogg|mpe?g|avi|zip|gz|bz2?|rar|swf)$ { try_files $uri $uri/ @fallback; } location / { try_files /does_not_exists @fallback; } } location @fallback { proxy_pass http://127.0.0.1:8080; proxy_redirect http://127.0.0.1:8080 /; proxy_set_header Host $host; proxy_set_header X-Forwarded-For $proxy_add_x_forwarded_for; proxy_set_header X-Forwarded-Proto $scheme; proxy_set_header X-Forwarded-Port $server_port; access_log off; }Apache configuration file
ScriptAlias /cgi-bin/ /var/www/<WWW-domain owner>/data/www/<domain name>/cgi-bin/ Options +ExecCGI AddHandler cgi-script <file extensions>NoteThe option is only available if the Apache web server is installed. Read more about installation in Web-servers.

Logs settings
- Select the website logs you want to keep. Read more in Website statistics.
- Access log — statistics on queries to the website;
- Error log — web server error statistics for the website;
- Select the log Rotation period :
- daily;
- weekly;
- monthly;
- by size → specify the Size, MB.
- In the Store archives field, specify the number of log files that will be stored in the archived form. NoteThe disk space occupied by the archives is included in the website owner's quota. Read more in Setting disk quotas.DetailsIn the Nginx configuration file for the WWW domain, lines in the following format are added:
Nginx configuration file
Lines in the following form are added to the Apache configuration file for the WWW domain:access_log /var/www/httpd-logs/<WWW domain name>.access.log; error_log /var/www/httpd-logs/<WWW domain name>.error.log notice;Apache configuration file
CustomLog /var/www/httpd-logs/<WWW domain name>.access.log combined ErrorLog /var/www/httpd-logs/<WWW domain name>.error.log - Select the Analyzer that will be used to collect statistics on website traffic. Specify the analyzer settings:
- Select the query statistics collection Period .
- Select the Statistics language .
- If necessary, enable the option Restrict access to statistics , specify the Password for access and Re-enter it . The name of the website owner will be used as the username.

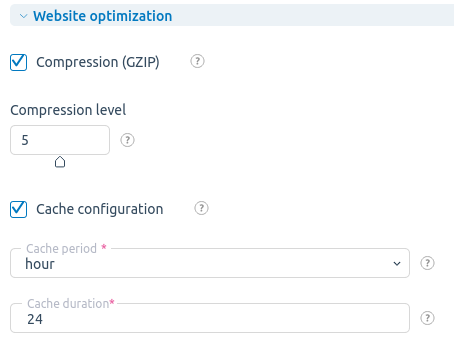
Website optimization
Website optimization allows improving your website performance. This option is available only for Nginx.
- Enable the Compression (GZIP) option to compress static content. Static content is files that rarely change: images, sounds, music, videos, etc. Such files, as a rule, occupy a large volume and slow down loading of the website. File compression reduces the time it takes for users to load the website. The compression level can be set from 1 to 9. The recommended value is 5. Read more in Enable compression.
DetailsThe following strings are added into the Nginx configuration file for the WWW-domain:Nginx configuration file
gzip on; gzip_comp_level <compression level>; gzip_disable "msie6"; gzip_types text/plain text/css application/json application/x-javascript text/xml application/xml application/xml+rss text/javascript application/javascript - To cache the website content, enable the Cache configuration option. When caching, the result of slow operations, which are performed when opening the website, is stored for a given period of time. The website is accelerated by showing users pre-saved data. However, if the cached content on the website changes, users will receive the old data until the cache expires. To configure the cache settings, specify the Cache period and the Cache duration . For example, 2 hours. DetailsThe location section of the Nginx configuration file for the WWW-domain
Nginx configuration file
contains the string:location / { location ~* ^.+\.(jpg|jpeg|gif|png|svg|js|css|mp3|ogg|mpe?g|avi|zip|gz|bz2?|rar|swf)$ { try_files $uri $uri/ @fallback; }Nginx configuration file
Example:expires <caching period>;Nginx configuration file
location / { location ~* ^.+\.(jpg|jpeg|gif|png|svg|js|css|mp3|ogg|mpe?g|avi|zip|gz|bz2?|rar|swf)$ { expires 2h; try_files $uri $uri/ @fallback; }
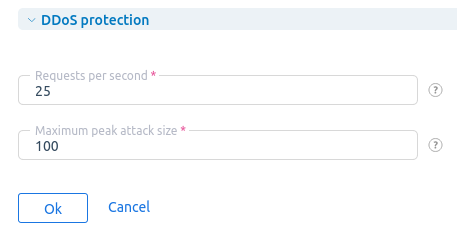
DDoS-protection
If you have Enabled DDoS protection, specify the protection parameters:
- Number of Requests per second from one IP address — if this parameter is exceeded, the IP address is blocked for 5 minutes.
- Maximum peak attack size — the number of requests per second above which new requests are blocked. DetailsThe ngx_http_limit_req_module module allows limiting the rate of requests by the specified key or requests from a certain IP address. Read more in DDoS protection.
Editing the website settings
To edit the WWW domain settings, enter Domains → WWW-domains → select the website → Edit button → Edit.
To change the web server settings for the WWW domain, enter Domains → WWW-domains → select the website → Configuration files button.
How to enable SEF URL (friendly URL)
SEF URL - the same as a human-readable URL - is an URL that consists of clear words instead of identifiers and reflects the file structure of the site. For example, /product/phone/Apple/ is used instead of /c11/2/33/ or /index.php?cat=10&subcat=2&id=41.
1. Open the configuration file.
/etc/nginx/vhosts/<username>/<website>.confSet the parameters.
- Username - the name of the user who owns the site;
- Site - site name specified in the list of sites.
2. Add the following line to the Nginx configuration file:
try_files $uri $uri/ /index.php?$args;
3. After making the configuration changes, save the file and restart the Nginx service to apply the new settings.