Reselling ispmanager SSL certificates through HostBill
HostBill offers the ispmanager reselling module, which automates the resale of SSL certificates through ispmanager.
Module features
| Features | Partner | Client |
|---|---|---|
| Certificate order | ||
| Downloading a CSR, private key, and certificate files | ||
| Requesting a certificate verification | ||
| Viewing service information | ||
| Viewing certificate verification information | ||
| Renewing a certificate | ||
| Reissuing a certificate | ||
| Viewing certificate issuance and installation instructions | ||
| Viewing the track of changes for a service | ||
| Deleting a service |
Module requirements
The ispmanager reselling module is available for free.
Module installation
- Log in to the HostBill server with the administrator account via SSH.
Download the module to the HostBill root directory:
wget-P /ROOT/HOSTBILL/ https://static.ispmanager.com/static/files/hostbill/ispmanager_reselling.zipGo to the HostBill root directory:
cd /ROOT/HOSTBILL/Unzip the archive:
unzip ispmanager_reselling.zip
Module activation
- Log in to HostBill with your administrator account at https://YOUR_DOMAIN/admin.
- Go to the Settings → Modules → Hosting Modules section.
In the Inactive tab, select the ispmanager_reselling module and click Activate.

Setting up connection to ispmanager
- Log in to HostBill with your administrator account at https://YOUR_DOMAIN/admin.
Go to the Settings → Apps Connections → Add new Connection section.

In the Application field, select ispmanager_reselling.

Fill out the connection details. Required fields are marked with asterisks.
- Name* — an arbitrary name under which the connection will be saved in HostBill. This name will only be visible to the HostBill administrator.
- Hostname* — the domain name of your ispmanager account — eu.ispmanager.com.
- Username* — the username in your ispmanager account.
- Password* — the user's password in your ispmanager account.
Leave unchanged.
- Click Test Configuration to check the connection. If the connection is successful, a notification with the status Success will be displayed.
- Click Add New Connection.
Creating services
Creation of services is available after creating at least one order page.
Order page
Order pages allow you to group services in the HostBill client area.
To create an order page:
- Log in to HostBill with an administrator account at https://YOUR_DOMAIN/admin.
- Go to Settings → Products & Services.
- Click Add new order page.
- Fill in the fields. Required fields are marked with asterisks.
- Name* — the name of the order page that will be displayed in the HostBill client area. For example, "ispmanager SSL certificates"
- Order page URL — click Edit to edit the automatically generated order page URL.
- This category will contain* — select Products.
- Order type* — select SSL Certificates.
Cart Template — select a cart template from the standard options or click Here to purchase a premium template. Click Preview to see a preview.

- Description — a description of the services that will be posted on the order page for the client area.
- Advanced : Order scenario — select an order scenario, the sequence of steps a client must complete when ordering services at the order page. Learn more about order scenarios in the official HostBill documentation.
- Click Add new order page.
Services
- Log in to HostBill with an administrator account at https://YOUR_DOMAIN/admin.
- Go to Settings → Products & Services.
- Select the previously created order page.
- Click:
- Add new product — to create a new service manually.
Import products — to create a new service based on a JSON template. Use this option if you already have a similar service in HostBill. The existing service must be exported first.
How to export an existing service in HostBill- Log in to HostBill with an administrator account at https://YOUR_DOMAIN/admin.
- Go to Settings → Products & Services.
- Select the previously created order page.
- On the order page, select the service you would like to export and use as a template.
On the General tab, click Export Product.
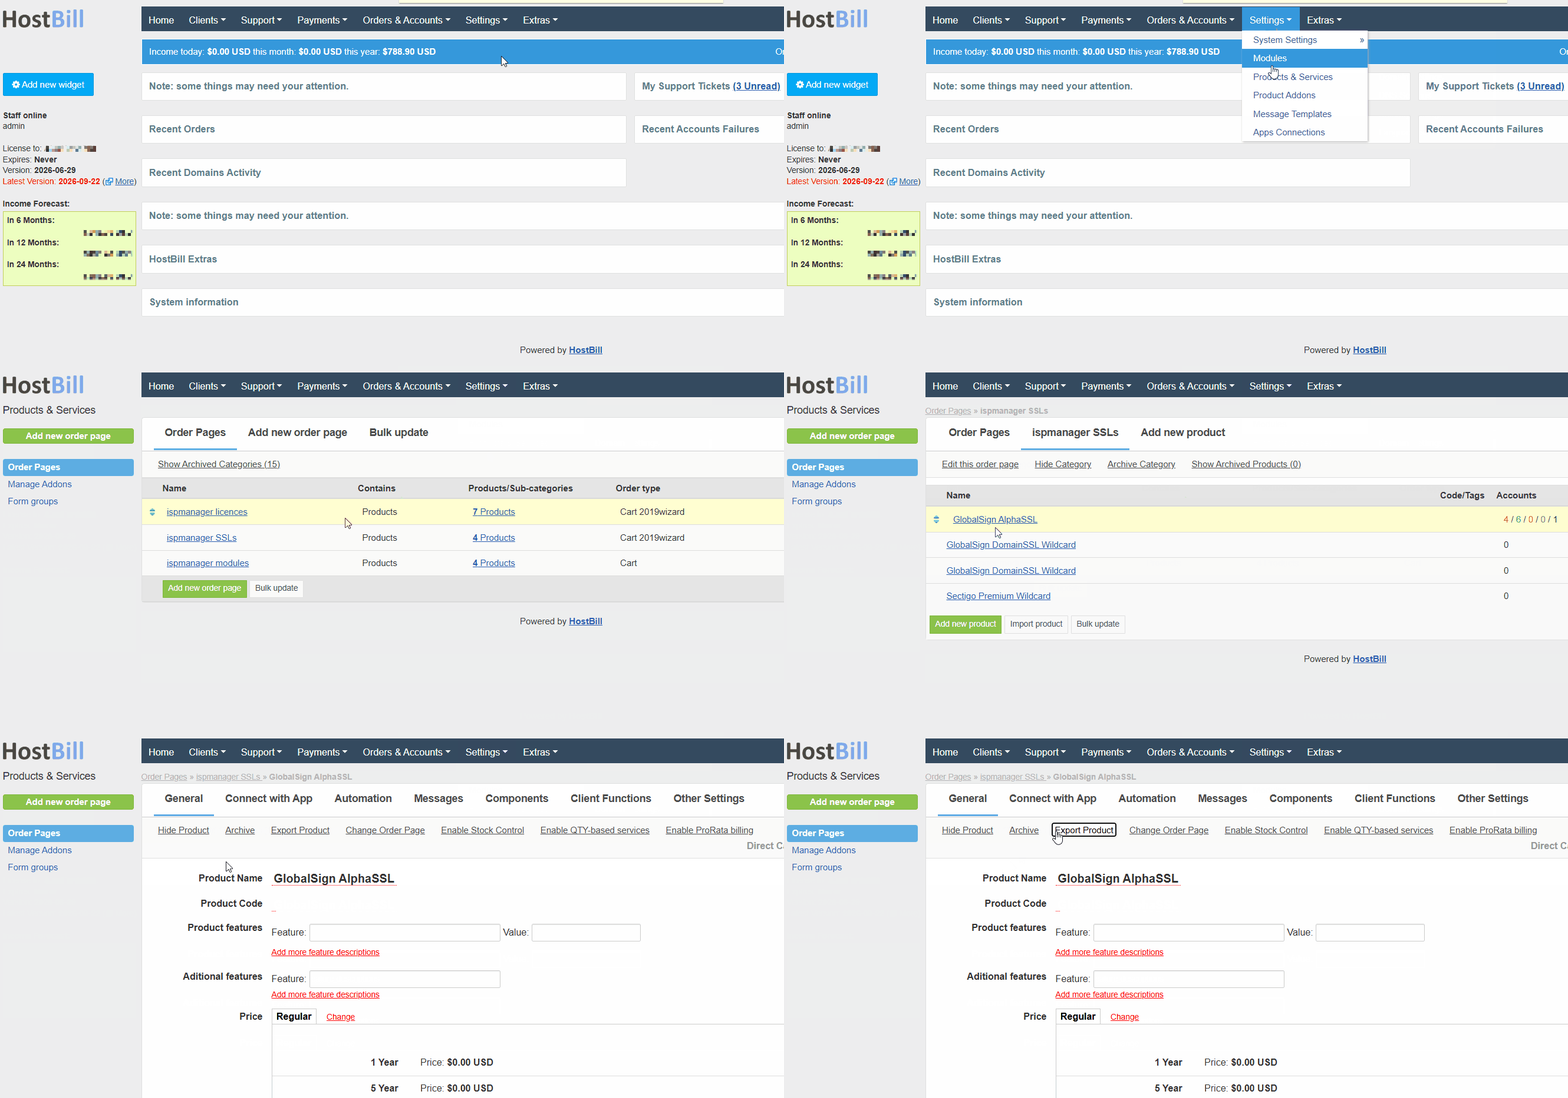
The file will be automatically downloaded to your computer.
Fill in or edit the fields on the tabs. Required fields are marked with asterisks.
General — main settings- Product Name* — name of the service.
- Product Code — an internal service code that is visible only to the HostBill administrator.
- Product Description — click Add description to add a description of the service, which will be displayed on the service card in the HostBill client area.
Price* — payment type:
For ispmanager SSL certificates, only the "Regular" payment type is available. Orders using other payment types will not be processed.
Select a billing period*:
Please use the billing periods available for a specific certificate in your ispmanager account. If you select other periods, your order will not be processed.
- 1 Year — available for all certificates.
- 2 Year — available for all certificates except GlobalSign, Digicert Secure Site Pro, and Digicert Secure Site Pro with EV.
- 3, 4, 5 Year — 3, 4, or 5 times per year. Available only for Sectigo (ex Comodo) Instant SSL, Sectigo (ex Comodo) EV SSL certificates, GeoTrust QuickSSL Premium, GeoTrust True BusinessID Wildcard, and GeoTrust True BusinessID with EV
- Setup Fee — a one-time payment for opening a service
- Upgrade Fee — a one-time payment for upgrading a service
- Billing Type* — select payment method:
- Pre-paid
- Post-paid
- Hybrid — not supported for SSL certificates.
- For each billing period and cost, create a separate price by clicking the Add pricing option.
- Tax — a tax that will be added to the service price. To enable tax, select the Yes option and select a tax group from the Tax Group list.

- Tags — tags for designating a service that are visible only to the HostBill administrator.
Connect with App — connection settings for ispmanager- App* — select ispmanager_reselling from the list.

App Connection* — to automatically order an SSL certificate for the client in ispmanager when ordering a service, select the previously created connection.
- Click Get values from server to automatically import services from your ispmanager account.
- Click Add new connection to add another connection.
Product ID* — enter the service ID manually or select it from the list if you imported the ID in the previous step.
Admin phone — enter the phone number that will be used as administrative and technical contact instead of the client number.
Automation — automated actions with customer servicesTo create a custom action with services, click Add custom automation task.
To copy settings from another service, click Copy automation settings.
For more information on setting up automation and adding your own automated actions, please refer to the HostBill documentation.
- Auto-create — ordering an SSL certificate in ispmanager:
- When the order is placed
- When the first payment is received
- After payment received, process by cron
- Automatic Upgrades — not supported for SSL certificates.
- Automatic Renew — automatic service renewal in HostBill. To renew the specific certificate, you will have to pass the verification once again.
- Renew account automatically after receiving payment
- When renewal invoice is issued
- Automatic Suspension
- Autosuspend account after X days past due date
- Automatic Unsuspension
- Unsuspend account automatically after receiving due payment
- Automatic Termination
- Automatically terminate account after X days past due date
- Automatically cancel related unpaid invoices
- Auto-cancel unpaid orders
- Cancel unpaid orders X days since creation
- Generate invoices
- X days before the due date for product/service
- Advanced due date settings
- Invoice is expected to be paid X days before the due date for service/product
- First invoice due date set to X days after order
- Move due date X days into future for recurring invoices
- Adjust Initial Period — shift the service start date to the time of payment. If the order is paid late, the service will begin on the payment date, not the order date.
Messages — notifications for the client and HostBill administratorTo customize the notification, click Change and select a notification template from the list.

To create a notification template, go to the Settings → Message Templates section.
- Client email notifications
- Initial Order
- Account created email
- Account suspended email
- Account unsuspended email
- Account terminated email
- Reminder of the service expiration
- Client: Success upgrade — not supported for SSL certificates.
- Admin email notifications
- Staff: Success upgrade — not supported for SSL certificates.
- Staff: Failed upgrade — not supported for SSL certificates.
- Client mobile notifications
- Account created email
Components — additional services available when ordering an SSL certificateOnly Forms are supported for SSL certificates.
Forms allow you to receive and store information about clients and services in the HostBill administrative and client areas. For SSL certificates, a form is automatically created with fields that are required for the client to fill in when ordering a certificate.
List of fieldsFor all certificates:
- Country — the client's country.
- State — the client's state/region/county.
- City — the client's city.
- Organization — the organization name or full name if the certificate is issued to an individual..
- Approver method — the certificate verification method:
- By email — via email. Available for all certificates.
- By DNS TXT record — via TXT record. Available for GlobalSign AlphaSSL, GlobalSign AlphaSSL Wildcard, GlobalSign DomainSSL, and GlobalSign DomainSSL Wildcard certificates.
- Approver email — the email address for verification via email. The hostname domain is automatically replaced with the client's domain.
For EV/OV certificates only:
- Organization name
- Organization country
- Organization state
- Organization city
- Organization ZIP code
- Organization address
- Organization phone
- Organization DUNS
For administrative, technical contact, and telephone numbers, the data from the client's personal account in HostBill will be used.
To add your own form or field, click one of the three buttons and configure it:
- Add new form field
- Import — import a form as a JSON or YML file
- Copy from product — copy a form from another product or service
For more information on configuration of forms, please refer to the official HostBill documentation.
Client Functions — actions with the ordered service available to clients in the HostBill client areaTo enable an action, click Enable next to the action. To enable all actions, click Enable all.

Enabled actions will be available for the client's active orders in their HostBill personal account in the Services section.
Available actions:
- License details — view information about an SSL certificate.
- Change Label — change the label that is diplayed next to the service you ordered.
- Change Ownership — transfer ownership of the license service to another HostBill user.
- Contracts — view the agreements accepted when ordering the license service. Available if agreement acceptance is configured for the service.
- Account Logs — view the log of actions with the service, such as activation, renewal, and termination.
- Manual Service Renew — early service renewal.
- Related Emails — view emails related to the service.
- Related Invoices — view invoices for the service.
- Service Auto Renewal — view the service's automatic renewal date, configure the renewal, and configure the payment method.
- Service notes — view service notes left for the client by the HostBill administrator.
Other actions are not supported for SSL certificates.
Other Settings — settings for cancellations, limits, etc.- Limit Per Customer — the maximum number of service orders available to one customer. To apply the limit, click Yes and specify the number of services in the One customer is allowed to order X products of this type field.
- Allow Cancellations — allow the customer to cancel the order:
- Yes, client can cancel service using this product
- Yes, client can cancel service after/for X days since account creation
- No, client cannot cancel service with this product
- Allowed Cancellation Types — allowed types of cancellations:
- Immediate
- End of billing period
- Pro-rate cancellations — cancellation with recalculation of the service cost
- No — prohibit
- Yes, for pre-paid services (for immediate cancelations)
- Yes, for post-paid services
- Full Month Billing — not supported for SSL certificates.
- Contract template — user agreement template. Select an agreement from the list or click See all contract templates to customize agreements.
- Client area Layout — the layout of the menu in the HostBill client area:
- Left menu
- Right menu
- Top menu
- Custom username — not supported for SSL certificates.
- Starting price calculation method — not supported for SSL certificates.
- Upgrades — not supported for SSL certificates.
- Click Save Changes.
- Create a separate service for each SSL certificate.
Test service creation
If the service was created correctly, it will be available for ordering in the HostBill client area. To check:
Log in to HostBill with a test client account at https://YOUR_DOMAIN/index.php or create a new account.
How to create a client test account in HostBillClick Login/Register → Create Account in the upper right corner of the interface.

- Fill in the fields. Required fields are marked with asterisks. The information may be fictitious. The list of fields may differ if it was changed in the Clients → Registration Fields section.
- Email Address*
- Password*
- Repeat Password* — confirm your password.
- First Name* — client's name.
- Last Name* — client's last name.
- Organization* — the name of the company if the Organization account type is selected.
- Address 1*
- Address 2
- City*
- State* — region/territory/district/region.
- Postal Code*
- Country*
- Phone*
- Account type
- Personal — for an individual
- Organization — for a legal entity
- Save the changes.
- On the main page of the client's personal account, click Order and select the desired order page.
If the services are active, they will be displayed on the page.
Actions with SSL certificates
- Log in to HostBill with your administrator account at https://YOUR_DOMAIN/admin.
- Go to the Orders and Accounts → Orders → Active Orders section for active orders and to the Pending Orders section for orders that await approval.
- Click on the required order in the list.
In the form that opens, in the Order items block, click on the service.

- Perform the required action:
- Renewal — renew your certificate. The service will be extended if there are 30 days or less left on the certificate's expiration date. You will need to pass the certificate ownership verification once again.
- Reissue — reissue the certificate. Only available for issued certificates. You will need to pass the certificate ownership verification once again.
- Validation — request certificate verification via email or DNS. Only available for GlobalSign certificates.
- Download certificate
- Download CSR
- Instruction — view instructions for issuing and installing an ispmanager certificate.
History — view the service history.
More about actions with services in the HostBill documentation.
- Click Save Changes.
For more information about all the features that can be enabled clients, see the Create Services → Services section in the Client Functions tab.
- Log in to HostBill with your client account at https://YOUR_DOMAIN/index.php.
- In the menu on the left, in the Services section, select the service order page.
In the list that opens, select the required service.

- Perform the required action:
- License Details — view certificate information and download certificate files:
- Download certificate
- Download CSR
- Download private key
- Reissue — reissue the certificate. You will need to pass the certificate ownership verification once again.
- Validation — request certificate verification via email or DNS. Only available for GlobalSign certificates.
- Account Logs — view the change history for a service
- Manual Service Renew
- Service Auto Renewal — view information about automatic renewal and change its settings
- Request Cancellation
- License Details — view certificate information and download certificate files: