Selling hosting with ispmanager through HostBill
Capabilities of the ispmanager module in HostBill
- Automatic creation of client accounts in ispmanager.
- Management of the ispmanager client account from the HostBill administrator and user account.
- Management of hosting services from the HostBill administrator and user account.
Ispmanager module requirements in HostBill
The ispmanager module is available in the ALL-INCLUSIVE tariff plan.
Log in to your HostBill account at clients.hostbillapp.com. Information about your current HostBill tariff plan is displayed in the Services section.
When using other HostBill tariff plans, the ispmanager integration module must be purchased separately.
Purchasing the ispmanager module through HostBill
- Click Add to your HostBill.

- Select the tariff — Standard or Developer — then click Buy now. You will be redirected to your HostBill account.
- If you have a promo code, click Use promotional code, enter the code in the Code field, then click ». Click Continue.
- In the Choose payment method section, select a payment method:
- Bank/ Wire Transfer
- PayPal, Credit Card, eCheck
- In the Client information block:
- New Client — create a new HostBill account
Already registered — log in to an existing HostBill account
- Email Address — your email address
- Password — the password to your HostBill account
- Repeat Password — confirm your password
- First Name — your name
- Last Name — your last name
- Organization — your place of work
- Address 1 — your mailing address
- City — your city
- State — your region/state/province
- Postal Code — your postal code
- Country — your country
- Phone — your contact phone number
- Company Number — your work phone number
- Image Verification — verification code from the image
- Email Address — your email address
- Password — the password to your HostBill account
- Image Verification — verification code from the image
- In field of the Notes/Additional Information block, please write a commentary (optional) and check the box I have read and accepted License agreement, Terms of Service, Privacy Policy.
Installing the ispmanager module in HostBill
- Log in to HostBill with an administrator account at https://YOUR_DOMAIN/admin or via SSH.
- Unzip the module archive into the HostBill root directory.
Activating the ispmanager module in HostBill
- Log in to HostBill with an administrator account at https://YOUR_DOMAIN/admin.
- Go to the Settings section→ Modules → Hosting Modules.
- In the Inactive tab, find the ispmanager module (ispmanager provisioning module) and click Activate.

Setting up connection to ispmanager
- Log in to HostBill with an administrator account at https://YOUR_DOMAIN/admin.
- Go to the Settings section → Apps Connections → Add new Connection.

In the Application field, select ispmanager.

Fill in the connection details. Required fields are marked with asterisks.
- Name* — an arbitrary name under which the server with ispmanager will be saved in HostBill. The server name will only be visible to the HostBill administrator.
Hostname — the hostname of the server running ispmanager.
How to find a server's hostname using ispmanager- Log in to the control panel with an administrator-level account or above.
- Go to the System Settings section. The host name is listed in the Server Name field.
- IP Address* — IP address servers with ispmanager. If the server running ispmanager uses multiple IP addresses, enter the one specified on the server's network interface and used to access the panel. By default, it is the IP address obtained from the server.
- Max No. of Accounts — the maximum number of users that can be created on a server with ispmanager.
- Username* — ispmanager root user name.
- Password* — password for root access to ispmanager.
- API port — the port used for connection to ispmanager. By default, port 1500 is used.
- Path — the path to the ispmanager panel. By default, https://IP:1500/ispmgr is used, where IP is the address of the server hosting the panel.
Specify the name servers that will be used to register the domain if the domain is configured as an additional hosting service in the Components → Domains section.
- NS 1 is the name of the name server, for example ns1.example.com
NS 1 IP — IP address of the name server
How to find nameservers in ispmanager- Log in to the control panel with an administrator-level account or above.
- Go to the DNS Management section.
- On the toolbar, click
 Domain Settings. The name servers are listed in the Name Servers field.
- To add another nameserver, click Add New Nameserver.
Specify the monthly costs of maintaining a server with ispmanager.
- Click Test Configuration to check the connection. If the connection is successful, a notification with the status Success will be displayed.
- Click Add New Connection.
- If you plan to use multiple servers with ispmanager to provide hosting services, configure the connection to each server separately.
Creating services in HostBill
Order pages
In the HostBill client area, services are grouped and placed on order pages, for example Starter Hosting or Ispmanager Hosting.
To create an order page:
- Log in to HostBill with an administrator account at https://YOUR_DOMAIN/admin.
- Go to Settings → Products & Services.
- Click Add new order page.
- Please fill in the fields. Required fields are marked with asterisks.
- Name* — the name of the order page that will be displayed in the HostBill client area.
- Order page URL — click Edit to edit the automatically generated order page URL.
- This category will contain* — what will be placed on the order page:
- Products — services.
- Subcategories — service categories on the order page.
- Order type* — select Shared Accounts.
- Cart Template — select a cart template from the standard options or click Here to purchase a premium template. Click Preview to see a preview.

- Premade products* — configure the creation of service templates:
- None — no templates.
- 4 Shared Hosting Packages — four standard template hosting services will be created: Starter Hosting, Business Hosting, Premium Hosting, and Ultimate Hosting.
- Description — a description of the services that will be posted on the order page for the client area.
- Click Add new order page.
- If you selected service categories instead of services in the This category will contain field when creating an order page, HostBill will offer to create categories.

To create a category, click Add new sub-category and follow the instructions for creating an order page.
Services
To add services:
- at least one user template must be created in ispmanager
- an order page and/or service category must be created in HostBill
- Log in to HostBill with an administrator account at https://YOUR_DOMAIN/admin.
- Go to Settings → Products & Services.
- Select the previously created order page and service category, if it was created previously.

- Click:
- Add new product — to add a new hosting service
- Import products — to import an existing service in a JSON file
- Starter, Business, Premium, Ultimate — to edit service templates if you selected 4 Shared Hosting Packages in the Premade products field when creating the order page.
- Fill in or edit the fields on the tabs. Required fields are marked with asterisks.
- Product Name* — name of the service.
- Product Code — an internal service code that is visible only to the HostBill administrator.
- Product Description — click Add description to add a description of the service, which will be displayed on the service card in the HostBill client area.
Price* — payment type:
The service will be available free of charge.
A one-time payment will be available for the service.
- Price — cost of the service
- Setup Fee — a one-time payment for opening a service.
The service will be available by subscription.
- Select a billing period*. For the first price, the default period is Monthly.
- Monthly
- Weekly
- Daily
- Quarterly — once every 3 months
- Semi-annually — once every six months
- Annually — once a year
- etc.
- Setup Fee — a one-time payment for opening a service.
- Upgrade Fee — a one-time payment for upgrading a service
- Billing Type* — select payment method:
- Pre-paid
- Post-paid
- Hybrid — a hybrid: prepayment is required for purchasing services, and postpayment is required for service upgrades.
For each payment period and cost, create a separate price by clicking the Add pricing option.

The cost of the service will be calculated based on the actual consumption of resources.
- Tags — tags for designating a service that are visible only to the HostBill administrator.
App* — select ispmanager from the list.

- Get values from server* — click to import user templates from ispmanager.
- Preset* — select a user template from the list. Based on the selected template, a user will be created for the client, resources will be allocated, and access permissions in ispmanager will be assigned.
To override the resources and accesses defined by the template, fill in the required fields manually.
Resources and permissionsSome of the resources presented here are not applicable for shared hosting services with ispmanager.
- IP — the IP address that will be used for the client's domain's A record if domain creation is selected.
- Create mail domain — not applicable
- Create WWW domain — create a domain for the client user in ispmanager
- Mail domain IP — not applicable
- Mail domain Greylisting — not applicable
- Mail domain SpamAssassin — not applicable
- Mail domain virus scanning — not applicable
- Mail domain DKIM — not applicable
- Mail domain DMARC — not applicable
- Mail domain secure connection — not applicable
- WWW-domains directory — not applicable
- FTP limit — the maximum number of FTP users a client user can have in ispmanager
- Email limit — the maximum number of email accounts a client user can have in ispmanager
- Mail domain limit — the maximum number of mail domains a client user can have in ispmanager
- Mailbox maximum size — the maximum size of each client user's mailbox in ispmanager
- Email limit per hour — the maximum number of emails a client user can send from each of their ispmanager email accounts per hour.
- Domain limit — the maximum number of domains a client user can have in ispmanager
- Web domain limit — the maximum number of websites a client user can have in ispmanager
- Database limit — the maximum number of databases a client user can have in ispmanager
- Database user limit — the maximum number of database users a client user can have in ispmanager
- Database size limit — the maximum disk space that a client user's databases can occupy in ispmanager
- Apache handlers — the maximum number of Apache handlers that can be installed for each client user site in ispmanager
- MySQL query limit — the maximum number of MySQL queries that each MySQL client user in ispmanager can execute per hour
- MySQL query limit per user — the maximum number of simultaneous MySQL connections that each MySQL client user can establish in ispmanager
- MySQL query limit per hour — the maximum number of MySQL connections that each MySQL client user in ispmanager can establish per hour
- MySQL update query limit — the maximum number of MySQL UPDATE queries that each MySQL client user in ispmanager can execute per hour
- The connection limit for the IP address is the maximum number of simultaneous connections from one IP address when accessing the client user's sites in ispmanager.
- Cron jobs limit — the maximum number of scheduler jobs that a client user can create in ispmanager
- CPU time limit — the maximum amount of CPU time that each Apache process of the client user in ispmanager can spend on processing
- RAM limit — the maximum amount of RAM that client user processes can use in ispmanager
- User processes limit — the maximum number of processes running simultaneously on behalf of the client user in ispmanager
- WWW-domains additional parameters — not applicable
- PHP — allow client users to use PHP for their websites
- Shell — allow the client user to access the Shell
- SSL — allow client user access to SSL
- CGI — allow client users to use CGI for their websites
- PHP as CGI — allow client users to use PHP in CGI mode for their websites.
- SSI — allow client user access to SSI
- PHP as Apache module — allow client users to use PHP as an Apache module for their websites.
- PHP in safe_mode — not applicable
- PHP FastCGI Apache — allow client users to use PHP in FastCGI (Apache) mode for their websites
- PHP FastCGI Nginx — allow client users to use PHP in FastCGI (Nginx) mode for their websites
- Regular backup — add the client user to the regular backup list and allow them to create their own backups
- Automatic anti-virus scanning — not applicable
- Auto-create — creating an account in ispmanager:
- When the order is placed
- When the first payment is received
- After payment received, process by cron — a periodic task after payment is received
- Automatic Upgrades
- When the order is placed
- After receiving payment
- Automatic Renew
- Renew account automatically after receiving payment
- When renewal invoice is issued
- Automatic Suspension
- Autosuspend account after X days past due date
- Automatic Unsuspension
- Unsuspend account automatically after receiving due payment
- Automatic Termination
- Automatically terminate account after X days past due date
- Automatically cancel related unpaid invoices
- Auto-cancel unpaid orders
- Cancel unpaid orders X days since creation
- Generate invoices — issuing invoices for payment:
- X days before the due date for product/service
- Advanced due date settings :
- Invoice is expected to be paid X days before the due date for service/product
- First invoice due date set to X days after order
- Move due date X days into future for recurring invoices
Adjust Initial Period — adjust the start date of the service if the order was paid late, so that the client receives the service for the full period
ExampleThe client signs up for the service on January 1. The service's validity period begins at this moment by default. The client pays for the order not immediately, but, for example, on January 5.
- Without the Adjust Initial Period: the customer effectively loses four days (from January 1 to January 4) during which they should have received the service but didn't have time to use it. Their access will still expire on January 31.
- With the Adjust Initial Period: the system "understands" that payment was received late, recalculates the dates at the time of payment and shifts the service start and end dates. The new service start date is January 5 (the payment date). The new service end date is February 4, i.e., exactly one month from the new start date.
Result: the client receives exactly 30 days of full access to the service from the moment of actual payment, and not from the moment the order is created.
- Automatic Cancellation Requests Processing — terminate your account after a cancellation request is created
- Send payment reminder emails — send payment reminders:
- Send Unpaid Invoice Reminder Email X days before the due date for service/product
- Send Overdue Invoice Reminder Email after 1, 2, 3 days after the due date for service/product
- Add more custom reminders
- Add Late Fee — add a penalty for late payment
- Add X % late fee Y days after the due date for service/product
- Send expiration notifications:
- X days before account expire date
- Send NOTIFICATION_TEMPLATE X days BEFORE/AFTER expire date
Add more expiration notifications — add your own notifications
To customize a notification, click Change and select a notification template from the list.

- Client email notifications:
- Initial Order
- Account created email
- Account suspended email
- Account unsuspended email
- Account terminated email
- Reminder of the service expiration
- Client: Successful upgrade
- Admin email notifications
- Staff: Success Upgrade
- Staff: Failed Upgrade
- Client mobile notifications
- Account created email
Add a form where clients can provide additional information when ordering a service:
- Add new form field — new form
- Import — import a form as a file in JSON or YML format
- Copy from product — copy a form from another product or service
Include an addon into your hosting service: an add-on that will be available for purchase along with hosting for an additional fee, such as a dedicated IP or additional disk space.
To order an addon, click Assign addon(s), select the addon from the Addon list and click Add.

Set up domain name registration or transfer as an addon to your hosting service, or allow customers to order hosting with their own domain or without specifying a domain.
- Hostname:
- Require hostname for this product* — check this box to make the Hostname field mandatory when ordering hosting. This field is required for automatic user account creation in ispmanager.
- Validation - checking the host name specified by the client:
- Do not validate provided hostname
- Check if provided hostname is valid DNS name
- Check if provided hostname is valid domain name
- Check if provided hostname is valid FQDN
- Auto-generate hostname — check the Enable box to generate the hostname automatically.
- Auto-hostname pattern — a template for generating a hostname
- Enable domain options — click Yes to configure domains when ordering hosting:
- Offer the following domain registration/transfer options — select an existing domain order page from the list or click Create new domain order page to create a new one
- Allow using own domain
- Only if domain was/will be registered with us
- Offer subdomain — check the box to provide subdomains to the client and enter the domain in which the subdomains will be created in the field
Add another service to your hosting service that will be available for order along with the hosting for an additional fee and will be placed as a separate order, such as an SSL certificate.
To enable an action, click Enable next to the action. To enable all actions, click Enable all.

Permitted actions will be available for the client's active orders in their HostBill personal account in the Services section.

Available actions:
- Access Control Panel — access ispmanager from your HostBill account without having to manually enter your login and password.
- Change Billing Cycle — change the billing cycle, for example, from monthly to semi-annually. This option is available if multiple billing cycles are configured for the hosting service.
- Change Label — change the label that appears next to the hosting service you ordered.
- Change Ownership — transfer ownership of the ordered hosting service to another HostBill user.
- Contracts — view the agreements accepted when ordering a hosting service. This view is available if agreement acceptance is configured for the hosting service.
- Databases — manage databases created in ispmanager from your HostBill personal account.
- Disk & Bandwidth Usage — view disk space and bandwidth usage data.
- Downloads — download files, such as additional software for the hosting service. File downloads are available if downloads are configured for the hosting service.
- Edit Forms — view and edit responses to the form the client filled out when ordering the hosting service. Viewing and editing are available if form filling is configured for the hosting service.
- Emails — manage mailboxes created in ispmanager from your HostBill personal account.
- FTP Users — manage FTP users created in ispmanager from your HostBill personal account.
- Login Details — view login details for ispmanager and access ispmanager from your HostBill account.
- Logs — view the event log for the account.
- Manage IP — manage the IP addresses assigned to the client. This option is available if the IPAM module was used to configure the hosting service.
- Manual Service Renew — create an invoice manually. Invoice creation is available if the hosting service payment type is set to Regular.
- Metered Billing Details — view the service cost, taking resource usage into account. This data is available if the hosting service is configured with the Metered payment type.
- New Direct Link — edit the direct link to the service
- Related Emails — view emails related to the service.
- Related Invoices — view invoices for hosting services.
- Related Services — view add-ons for your hosting service.
- Reset Password — change your HostBill personal account password.
- Service Auto Renewal — configure automatic renewal of your hosting service. This setting is only available for the Regular and Pre-Paid payment types, and if automatic renewal is configured for the hosting service.
- Service Notes — view administrator notes for the service.
- Status Updates
- Service Auto Payment
Actions not applicable for virtual hosting service with ispmanager:
- Access WebMail
- Manage IP (Colocation, Dedicated Servers)
- Reverse DNS (Colocation, Dedicated Servers)
- Limit Per Customer – limit on the number of hosting services ordered:
- One customer is allowed to order X products of this type
- Allow Cancellations — allow the customer to cancel the order:
- Yes, client can cancel service using this product
- Yes, client can cancel service after/for X days since account creation
- No, client cannot cancel service with this product
- Allowed Cancellation Types — allowed types of cancellations:
- Immediate
- End of billing period
- Pro-rate cancellations — cancellation with recalculation of the service cost
- No — prohibit
- Yes, for pre-paid services (for immediate cancellations)
- Yes, for post-paid services
- Full Month Billing — a billing model in which the client pays the full monthly fee, regardless of the service activation date. Subsequent payments are made at the beginning of each month.
- Enabled
- Disabled
- Contract template — agreement template:
- See all contract templates
- Client area Layout — the appearance of the client's personal account:
- Left menu — menu for actions on the left
- Right menu — menu for actions on the right
- Top menu — the menu of actions at the top
- Custom username:
- Username generation pattern — a template for generating usernames
- Upgrades — service upgrades
- Available Upgrades — select the services that will be available for the current service as an upgrade
- Upgrade pro-rata — upgrade with recalculation of service cost
- Seconds — recalculate taking into account the number of seconds until the next payment date
- Hours — recalculate taking into account the number of hours until the next payment date
- Days — recalculate taking into account the number of days until the next payment date
- Queue Pro-rata Charges — queue recalculated payments:
- Disabled — issue an invoice for the past period immediately
- Enabled — queue the invoice for the past period
- Credit on Downgrade — credit the payment amount to the client's HostBill account upon downgrading
- Default, use system billing settings
- No, do not credit customer pro-rated amount on package downgrade
- Yes, credit customer pro-rated amount on package downgrade
- Yes, credit customer pro-rated amount on package downgrade, only after client doesn't have unpaid invoices (credit downgrade queue)
- Credit note on Downgrade
- Default, use system billing settings
- No, do not issue credit notes on downgrades
- Yes, issue credit notes on downgrades
- Out-of-stock Upgrade — an upgrade to a current service if it is not available
- No, prevent upgrades to this product when it is out of stock
- Yes, allow upgrades to this product even when it is out of stock
Click Save Changes.
Create a separate service for each hosting plan.
Test order in HostBill
To check that the service is available to customers and orders are being processed correctly, please place a test order:
- Log in to HostBill with an administrator account at https://YOUR_DOMAIN/admin.
- Create a test order page and hosting service.
If you don't have a test client account with HostBill, please create one.
How to create a client account in HostBill- Go to Clients → Register New Client.
- Fill in the fields. Required fields are marked with asterisks. The information may be fictitious. The list of fields may differ if it was changed in the Clients → Registration Fields section.
- Email Address*
- Password
- Repeat Password — confirm your password.
- First Name — client's name.
- Last Name — client's last name.
- Organization — the name of the company if the Organization account type is selected.
- Address 1
- Address 2
- City
- State/Region — region/territory/district/region.
- Zip Code
- Country
- Phone Number
- Account type:
- Private — for an individual
- Organization — for a legal entity
- Optional — leave blank
- Status* — account status, select Active.
- Group — account group, None is the default.
- Save the changes.
Go to the HostBill client area.
How to access the HostBill client areaImmediately after creating a test client, click Login as Client above the client's profile.

If you need to access the client's client area later, the client's profile will be available in the Clients → Manage Clients section.
Order a hosting service in the client area.
How to order a hosting service in HostBillThe appearance and set of fields for the test service may differ depending on the settings selected when creating an order page and hosting service.
- Click Order and select a service category.
- Select a service and click Continue.
- Fill in the required fields and click Checkout.
- Please check that your order details are correct and confirm your order.
If successful, an order confirmation with its number will be displayed.

If the Auto-create option was enabled on the Automation tab when creating the service, an ispmanager account will be automatically created for the test client.
How to check if an ispmanager account has been createdIf Access Control Panel feature was enabled in the Client Functions tab when creating a test service for a client, access ispmanager from the client's personal account in HostBill. If this option was not enabled, access ispmanager by manually entering the client's authorization information.
- Go to Services → SERVICE_CATEGORY NAME.
- Find the service you need in the list and click on it.
- Click Access Control Panel on the right. You will be automatically logged in to ispmanager under your user account.
- In the HostBill admin panel, go to the Clients → Manage Clients section.
- Find the required client in the list and open his profile.
- Go to the Orders tab.
- Find the test order and open it. The ispmanager login information will be in the Order items section.
If necessary, remove the test service.
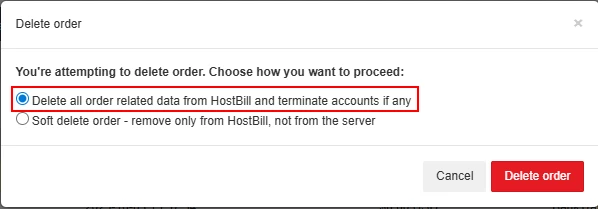
How to delete a test service in HostBill- In the HostBill navigation area, go to Orders & Accounts → Orders → Active Orders.
- Select the desired order and click Delete.
To delete a user account from the ispmanager panel, select the Delete all order related data from HostBill and terminate accounts if any option in the confirmation window.