Selling ispmanager licenses through BILLmanager as part of a virtual server
In BILLmanager, ispmanager licenses can be sold either as standalone services or as part of a virtual server.
For more information on organizing virtual server sales in BILLmanager, please refer to the official ISPsystem website.
Step 1. Configuring the VMmanager service handler in BILLmanager
To resell ispmanager licenses as part of a virtual server, use two processing modules:
- one as a license server
- the other with VMmanager 6 integration
If a processing module with VMmanager 6 integration already exists, ensure that the ispmanager license server is selected as the license server.
If there is no processing module with VMmanager 6 integration, create one:
- Log in to BILLmanager as an administrator at https://YOUR_DOMAIN/billmgr.
- Go to Integration → Processing modules.
- On the toolbar, click Add.
- At the Product type step, select VPS.
- At the Processing module step, select VMmanager 6.
- At the Integration settings step, fill in the required fields:
- URL — your VMmanager 6 domain or external IP address. Example: https://10.20.30.40/vm/manager
- Username — administrator login with access to the VMmanager 6 host
- Password — administrator password with access to the VMmanager 6 host
- Server — select ispmanager license server
- At the Processing module parameters step, specify the handler creation details:
Data center — a set of servers connected from the BILLmanager side
How to create a data center- Go to Integration → Data centers.
- On the toolbar, click Add.
- In the settings, enter the data center details:
- Name — data center name displayed in the interface for a specific localization
- External data center id — leave blank
- Sorting order — priority of the data center among others connected in BILLmanager. Sorting uses natural integers from 1 to N (the lowest number has the highest priority)
- Click Ok.
- Name — handler name displayed in the interface for a specific localization
Department — department in BILLmanager processing module tasks will be assigned to. Example: “Technical department”, “Sales department”, or “Service processing department”. Tasks will only be visible to the selected department.
How to create a responsible department- Go to Provider → Departments.
- On the toolbar, click Add.
- In the settings, enter the following department details:
- Main settings:
- Name — department name displayed in the interface for a specific localization
- Business hours— department working hours that define its response time. To select a schedule, create one under Provider → Business hours.
- Show in Support center — check this box to make the department available for clients when submitting a support request. This enables Department settings.
- Task localization — localization used for task notifications assigned to the department. Additional languages are available if added under Settings → Localizations.
- Department settings:
- Available to clients of the selected provider — providers whose clients will see this department when creating a request.
- Head of department — head of the support department. To select an employee, create one under Provider → Employees.
- Ticket category description — short description of the department and its responsibilities, shown to clients when selecting a department.
- Sort — priority of the department among others in BILLmanager. Sorting uses natural integers from 1 to N (the lowest number has the highest priority).
- Main settings:
- Sort — processing module priority among others connected in BILLmanager. The handler with the lowest priority number is selected for service processing. Use natural integers from 1 to N.
- Cluster — VMmanager cluster in which virtual machines will be created.
- Use recipe — check this box to execute a script or install additional software for the virtual machine, e.g., the ispmanager panel.
- Additional network interface — check this box to enable a second network interface for the virtual machine. This feature works if both main and additional interfaces are configured in the VMmanager cluster. The handler will be linked to one of the clusters (KVM or LXD).
- Click Finish.
Step 2. Creating enumeration items for tariffs in BILLmanager

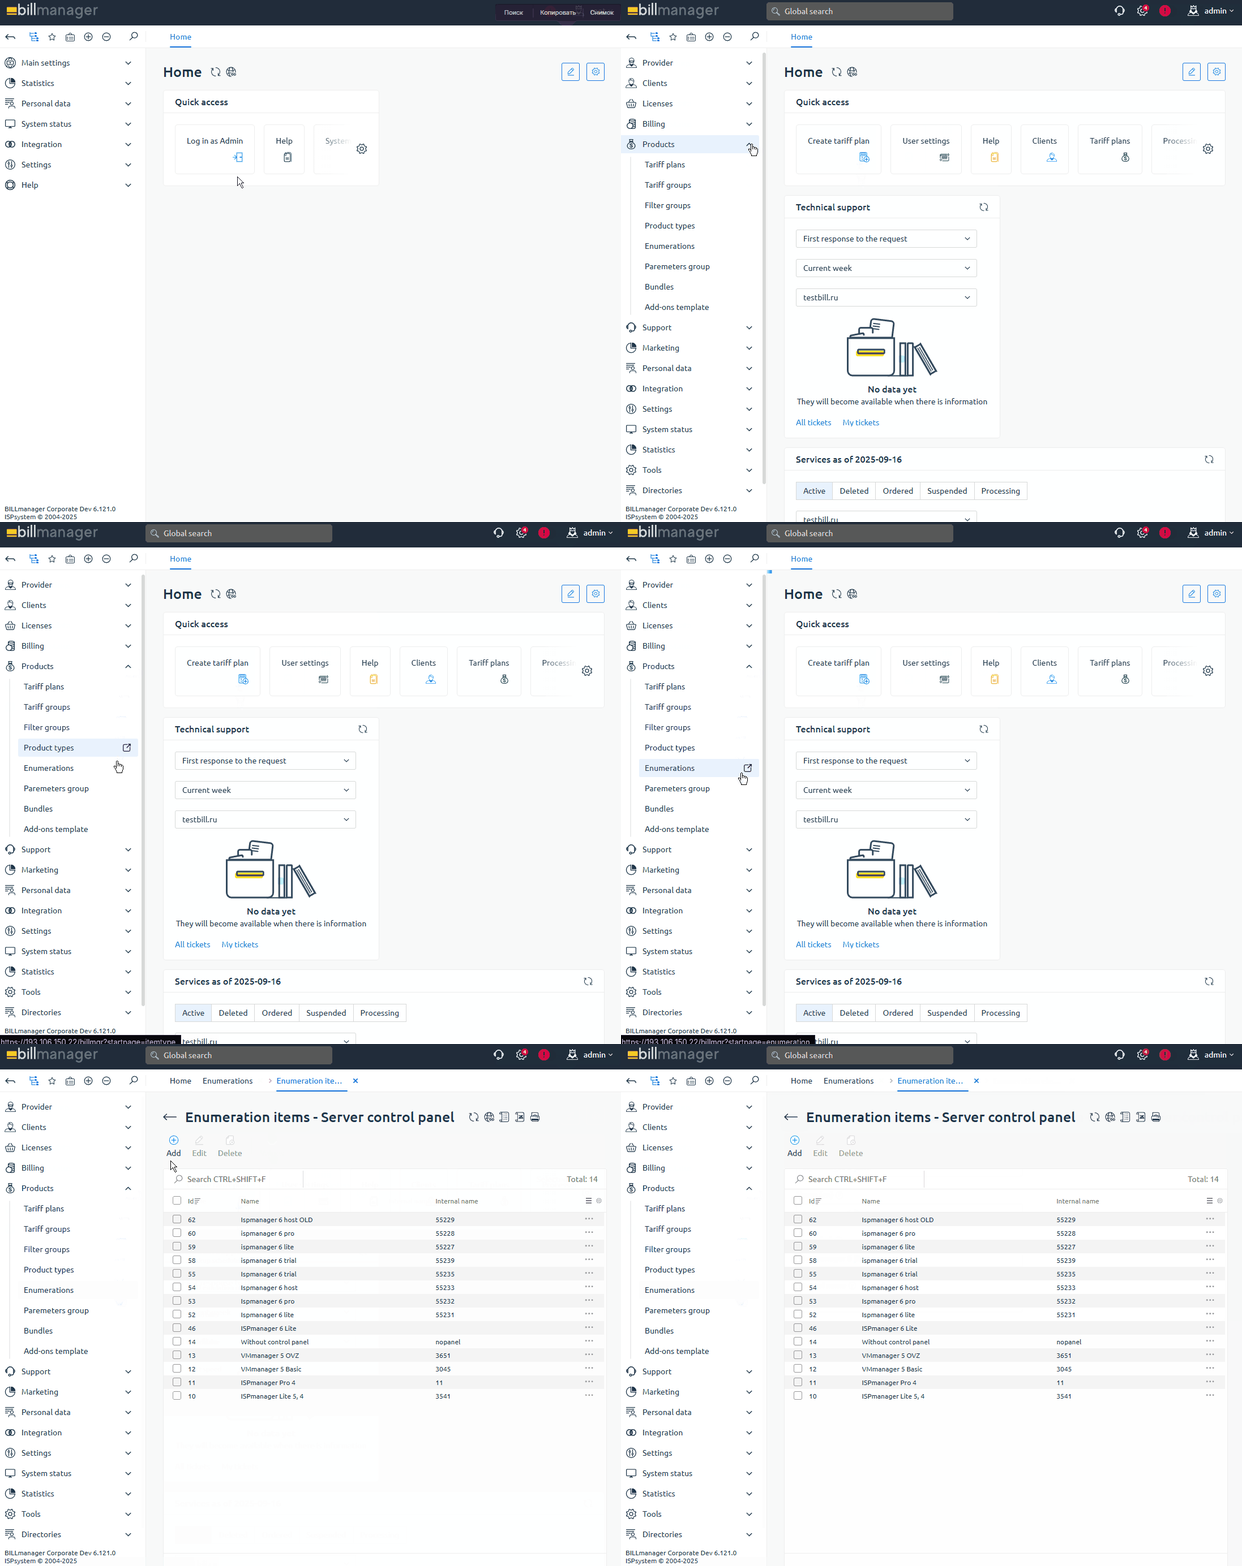
- Log in to BILLmanager as an administrator at https://YOUR_DOMAIN/billmgr.
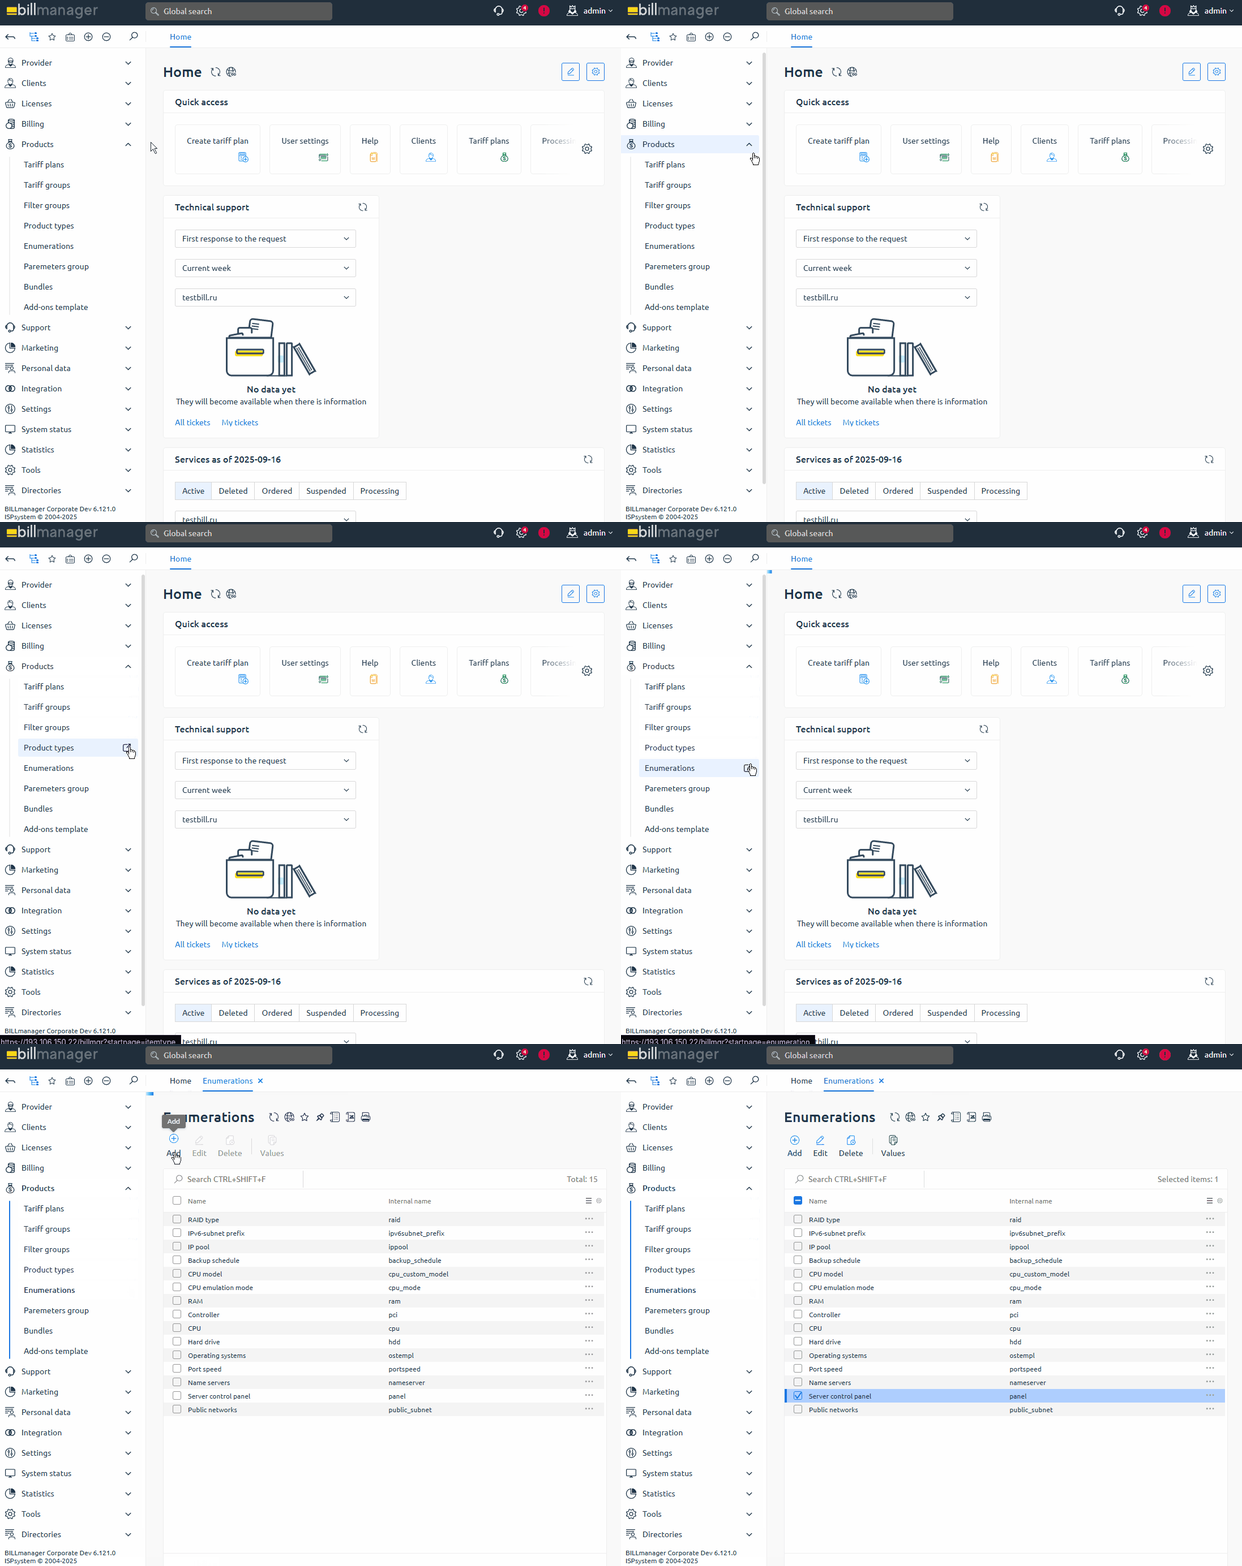
- Go to Products → Enumerations.
Create and open the enumeration Server control panel.
How to create enumerations
- Go to Products → Enumerations.
- On the toolbar, click Add.
- Enter the enumeration creation details:
- Name — specify Server control panel
- Internal name — specify panel as the internal enumeration code for ispmanager
- Click Ok.
- Click Values on the toolbar.
- Sequentially create enumeration items for ispmanager 6 lite, pro, and host plans:
- Name — tariff name displayed in the interface for a specific localization. Additional languages are available if added under Settings → Localizations.
Internal name — service code for the ispmanager tariff:
- 55231 — tariff code for ispmanager 6 lite
- 55232 — tariff code for ispmanager 6 pro
- 55233 — tariff code for ispmanager 6 host
- 55227 — tariff code for ispmanager 6 lite
- 55228 — tariff code for ispmanager 6 pro
- 55229 — tariff code for ispmanager 6 host
- Click Ok.
Step 3. Configuring the virtual server tariff in BILLmanager

- Log in to BILLmanager as an administrator at https://YOUR_DOMAIN/billmgr.
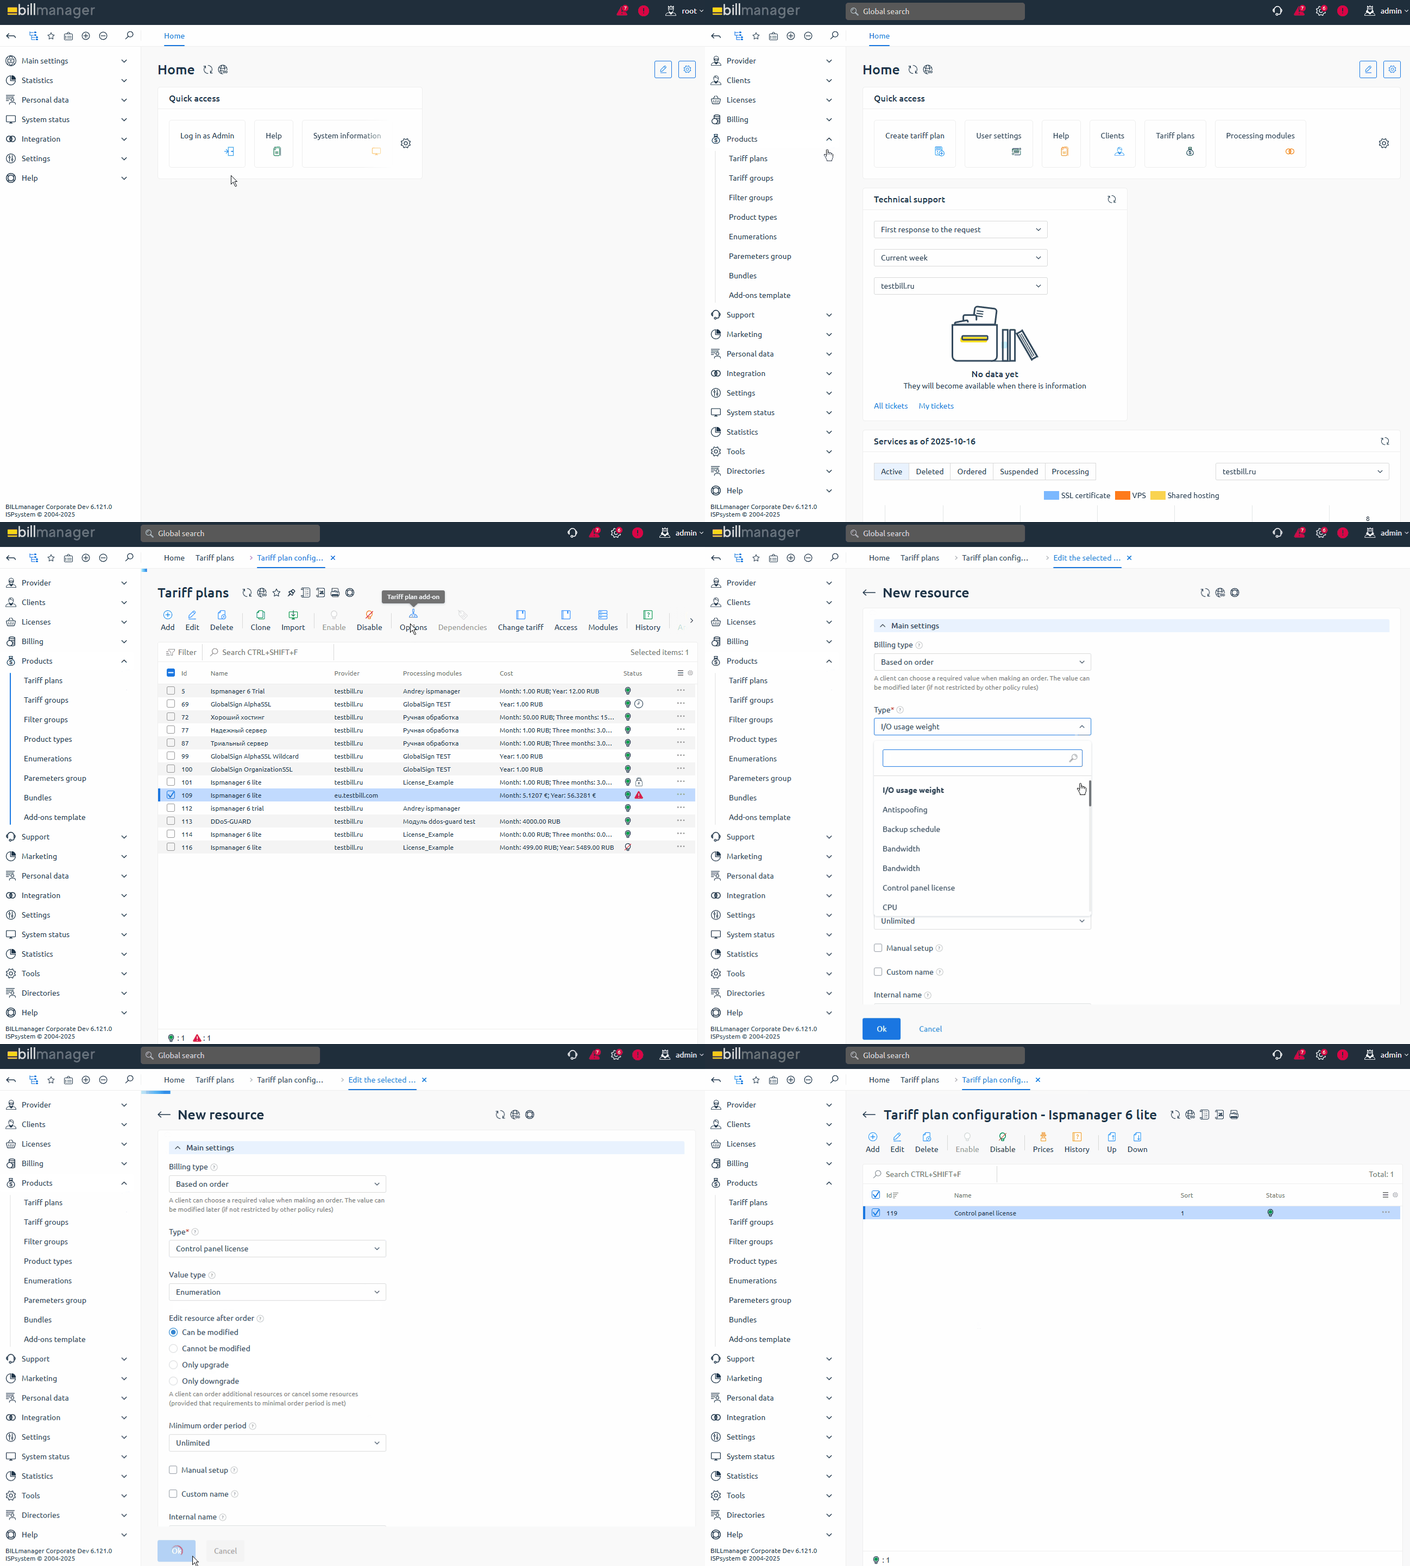
- Go to Products → Tariff plans.
- Select the desired virtual server tariff and click Options on the toolbar. If the virtual server tariff does not exist yet, create it.
- Enable Control panel license and set the pricing. If the item does not exist, create it.