Step 1. Setup of ispmanager license handler in BILLmanager
The integration is configured between the partner's BILLmanager and the ispmanager billing system. It enables the resale of ispmanager 6 lite, pro, and host licenses.
For more information on the service processing mechanism in BILLmanager, please refer to the official ISPsystem website.
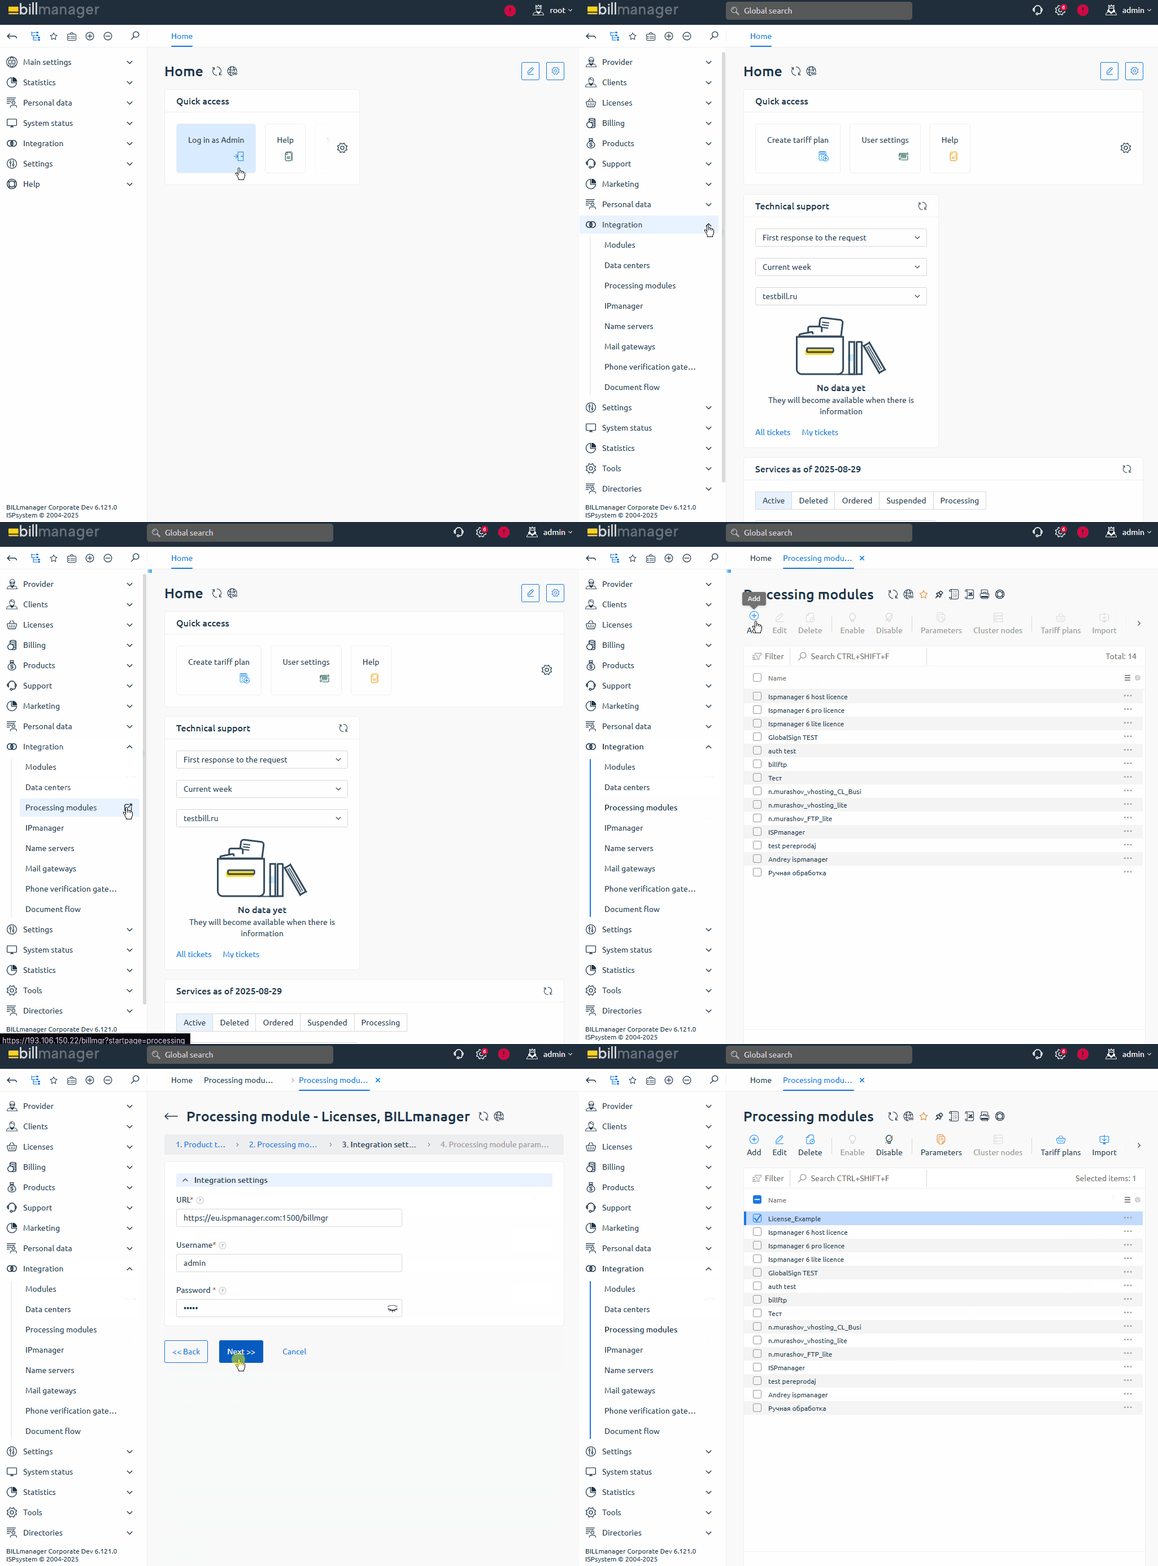
To configure the integration, start by connecting a processing module in BILLmanager:

- Log in to BILLmanager with an administrator account at https://YOUR_DOMAIN/billmgr.
- Go to Integration → Processing modules.
- On the toolbar, click Add.
- At the Product type step, select Licenses.
- At the Processing module step, select BILLmanager.
- At the Integration settings step, fill in the required fields:
- URL — the address of the ispmanager billing system that will provide licenses: https://api-eu.ispmanager.com
- Username — the login of the account used to make purchases in the ispmanager client area.
Password — the password of the account used to make purchases in the ispmanager client area.
If 2FA is enabled for the ispmanager account, BILLmanager will display an error when connecting the processing module. Disable 2FA or use a different account for integration.
- Click Next.
- At the Processing module parameters step, specify the data required to create the module:
Data center — a set of servers connected from the BILLmanager side.
How to create a data center- Go to Integration → Data centers.
- On the toolbar, click Add.
- In the settings, enter the data to create a data center:
- Name — the name of the data center in the interface for a specific localization.
- External data center id — the data center service code from a third-party system.
- Sorting order — priority of the data center among others connected in BILLmanager. Sorting uses natural integers from 1 to N (the lowest number has the highest priority).
- Click Ok.
- Name — the handler name in the interface for a specific localization.
Department — the department in BILLmanager responsible for tasks assigned by the module. Examples: 'Technical department', 'Sales department', or 'Service processing department'. Tasks will only be visible to the selected department.
How to create a responsible department- Go to Provider → Departments.
- On the toolbar, click Add.
- In the settings, enter the data to create the department:
- Main settings:
- Name — the department name in the interface for a specific localization.
- Business hours— department working hours that define its response time. To select a schedule, create one under Provider → Business hours.
- Show in Support center — check this box to make the department available for clients when submitting a support request. This enables Department settings.
- Task localization — localization used for task notifications assigned to the department. Additional languages are available if added under Settings → Localizations.
- Department settings:
- Available to clients of the selected provider — providers whose clients will see this department when creating a request.
- Head of department — head of the support department. To select an employee, create one under Provider → Employees.
- Ticket category description — short description of the department and its responsibilities, shown to clients when selecting a department.
- Sort — priority of the department among others in BILLmanager. Sorting uses natural integers from 1 to N (the lowest number has the highest priority).
- Main settings:
- Sort — processing module priority among others connected in BILLmanager. The handler with the lowest priority number is selected for service processing. Use natural integers from 1 to N.
- Processing module minimal balance — the minimum handler balance required for successful service renewal. An ispmanager account with a positive balance is required. The value is specified in the currency of the ispmanager account balance. The currencies of the selling and reselling platforms must match.
- Click Finish.
After connecting the module, configure the tariffs in BILLmanager.