Selling hosting with ispmanager through BILLmanager
BILLmanager offers automated reselling of virtual hosting in ispmanager.
Integration features
| Features | Clients | Administrators |
| Create, manage, and delete a user account in ispmanager | ❌ | ✅ |
| Create and manage a domain and name server in ispmanager | ❌ | ✅ |
| Delete a domain in ispmanager | ✅ | ✅ |
| Create and manage a hosting resale service | ❌ | ✅ |
| Create, manage, and delete additional resources for the hosting resale service | ❌ | ✅ |
| Order hosting | ✅ | ✅ |
| Manage your hosting order (upgrading or downgrading your tariff plan) | ✅ | ✅ |
| Change the password for a user account in ispmanager | ✅ | ✅ |
| Access ispmanager user account from BILLmanager | ✅ | ✅ |
| Return to the active BILLmanager account from ispmanager | ✅ | ✅ |
Requirements for hosting resale
To set up the integration, the latest versions of the ispmanager 6 panel and the BILLmanager platform are required.
Creating and configuring a processing module
To set up the integration, start by connecting the processing module in BILLmanager:
- Log in to BILLmanager with your administrator account at https://YOUR_DOMAIN/billmgr.
- Go to Integration → Processing modules.
- On the toolbar, click Add.
- At the Product type step, select Shared hosting.
- At the Processing module step, select ISPmanager 6.
- At the Integration settings step, enter the following data:
- Integration settings:
- URL — your ispmanager dashboard domain or IP address. Example: https://example.com:1500/ispmgr/
- Username — login of an existing administrator or reseller account in the ispmanager panel that will provide shared hosting services
- Password — password of an existing administrator or reseller account in the ispmanager panel that will provide shared hosting services
- Integration with IPmanager:
IPmanager — a server in IPmanager that will allocate IP addresses. Servers are available if integration between IPmanager and BILLmanager is configured.
If IPmanager is not usedA mock setup is available via ispmanager. To do this:
- Log in to ispmanager with an administrator-level account or above.
- Go to the Users section.
 Create user or select an existing user.
- On the toolbar, click
 Rights.
 - Select IP addresses from the list.
- On the toolbar, click
 .
. - Confirm that you want to disable IP address access for the user.
Next, return to BILLmanager :
- Go to Integration → IPmanager .
- On the toolbar, click Add.S
- Enter the following data in the settings:
- Connection:
- Name — the name of the connection to IPmanager in the BILLmanager interface
- URL — your ispmanager dashboard domain or IP address. Example: https://example.com:1500/ispmgr/
- Username — login of the account with user-level rights in ispmanager which the BILLmanager integration will be configured with
Password — the password for the account with user-level rights in ispmanager which the BILLmanager integration will be configured with
For more information on synchronizing IP address lists between IPmanager and BILLmanager, visit the official ISPsystem website.
- Connection:
- Click Ok.
- Integration settings:
- Click Next.
- At the Processing module parameters step, specify the details:
Data center — a set of servers connected from the BILLmanager side
How to create a data center- Go to Integration → Data centers.
- On the toolbar, click Add.
- In the settings, enter the data center details:
- Name — data center name displayed in the interface for a specific localization
- External data center id — leave blank
- Sorting order — priority of the data center among others connected in BILLmanager. Sorting uses natural integers from 1 to N (the lowest number has the highest priority)
- Click Ok.
- Name — name of the processing module displayed in the interface for a specific localization
Department — department in BILLmanager processing module tasks will be assigned to. Example: “Technical department”, “Sales department”, or “Service processing department”. Tasks will only be visible to the selected department.
How to create a responsible department- Go to Provider → Departments.
- On the toolbar, click Add.
- In the settings, enter the following department details:
- Main settings:
- Name — department name displayed in the interface for a specific localization
- Business hours — department working hours that define its response time. To select a schedule, create one under Provider → Business hours.
- Show in support center — check this box to make the department available for clients when submitting a support request. This enables Department settings.
- Task localization — localization used for task notifications assigned to the department. Additional languages are available if added under Settings → Localizations.
- Department settings:
- Available to clients of the selected provider — providers whose clients will see this department when creating a request.
- Head of department — head of the support department. To select an employee, create one under Provider → Employees.
- Ticket category description — short description of the department and its responsibilities, shown to clients when selecting a department.
- Sort — priority of the department among others in BILLmanager. Sorting uses natural integers from 1 to N (the lowest number has the highest priority).
- Main settings:
- Sorting — the priority of the processing module among others connected to BILLmanager. Sorting uses natural integers from 1 to N (the lowest number has the highest priority).
- Click Finish.
Once created, the handler will be automatically enabled. Next, proceed to creating plans for reselling hosting with ispmanager 6.
Tariff management
To make hosting available to clients, create, configure, and enable a tariff plan. Edit tariff addons if necessary.
Creating a tariff
- Log in to BILLmanager with your administrator account at https://YOUR_DOMAIN/billmgr.
- Go to Products → Tariff plans.
- On the toolbar, click Add.
- At the Product type step, select Shared hosting and set the values:
Provider - a provider that provides hosting services
How to create a provider- Go to Provider → Providers.
- On the toolbar, click Add.
- Enter the details to create a provider:
- Main settings:
- Name — name of the provider
- Upload icon 16x16 — an image that will be used in the list of available providers. Maximum size: 16x16 pixels
- Email for notifications — the email address from which notifications will be sent to clients. To ensure successful notification sending, set up an external mail server and outgoing email gateway.
- Support email — the email address from which notifications will be sent: about user activation, payer activation, and password recovery. Leave blank to send notifications from the Email for notifications.
- Web-site URL — the address of your website
- Billing URL — a public address with access to BILLmanager
- Help URL — the address of the page that will be opened for the client from the Help → Help section
Currency — the currency used for settling orders with clients of one provider. After creating a provider, you can change the currency. New accounts in the new currency will be created for all clients. Clients who already had an account registered in the old currency will retain their account.
If there are active payments or uncovered expenses in the system, the currency change will not occur.
- Default Country — the default country and interface localization
- Methods of registration and authorization:
- By phone number — enable phone number authorization. When registering or logging into BILLmanager, you will be asked for a confirmation code via an SMS. If your phone number is not provided or not confirmed, you will need to log in with your username and password.
- Number of code entry attempts — the limit on the number of times an incorrect code can be entered. Once the limit is reached, a new confirmation code will be required.
Number of code retrieval attempts — the limit on the number of times a new confirmation code can be sent to a phone number. Once the limit is reached, a timeout will be required before another authorization attempt can be made.
For more information on employee registration and authorization methods, please refer to the official ISPsystem documentation.
- Main settings:
- Activate after creation — check the box to enable the tariff plan immediately after creation. This option is enabled by default.
At the Tariff plan parameters step, enter the following data:
Main settings- Name — the plan name in the interface with a specific localization. Additional languages are available if added in Settings → Localizations.
- Processing module — select the processing module created earlier
- Account template — the name of a new or existing user template in ispmanager. The template will be used when ordering hosting services in BILLmanager to create new users in ispmanager.
- Charge daily — daily charges for hosting use. If enabled, the following options are available:
Calculate daily cost depending on order period — the daily charge amount will not depend on the number of days in the month. The daily cost will be calculated based on the number of days in the order period.
ExampleIn January, a client orders a monthly service. The daily charge is $0.1. Without this option, the charge will be $3.1 for 31 days of the month. With this option, the cost will be calculated based on the number of days in the service period (30 days). Thus, the client will pay $3 for 30 days of service use.
- Allow clients to resume/suspend services — the client will have the right to enable and disable the ordered hosting. Not set by default.
- Charge client after suspension — if enabled, the client pays for the hosting's downtime. If disabled, the client will be refunded for the hosting's downtime. Not set by default. Not set by default.
- Calendar-based charges — the service term will be aligned with the calendar month. Not available when using the Charge daily option.
Pro-rata day — if a customer orders a service on the day of the month before the transition day, the service term will be calculated until the end of the current month. If a service is ordered on the transition day or later, the service term will be calculated until the end of the following month. The order or renewal price will be adjusted accordingly. Default value: 15.
ExampleThe Pro-rata day is set to 15. The service the client ordered on July 12 will be active until August 1. The service the client ordered on July 17 will be active until September 1.
- Quick order — order a hosting service without specifying parameters. Allows you to defer configuration until you order the service. Not set by default.
- Service activation notification template — a notification template with instructions on how to use the hosting service. The notification is sent to the client via email after the service is activated and is also repeated in BILLmanager. Available if the template has been previously added in Settings → Message templates.
- Service agreement — a service agreement template that the client must agree to when ordering a hosting service. Available if a template has been added in Settings → Document templates.
- Create all add-ons — when you create a plan, all addons available for the plan will also be created. To start this option, create and configure addons in Products → Tariff plans → select a plan → Config. Enabled by default.
Additional settingsUsername template — used to generate usernames when ordering services in BILLmanager and creating users in ispmanager . Maximum character limit: 16. Macros are supported in the template. Default template: user@ID@. Example username: user510.
Username template macros- @USERNAME@ — the username of the current account in BILLmanager.
- @DOMAIN@ — generated domain name.
- @ID@ — user identifier.
- @ACCOUNT_ID@ — user code, service owner in BILLmanager.
Default domain template — used to generate a service domain name if the customer doesn't specify one when ordering. If a third-level domain is specified and the second-level domain is created on a free nameserver, the generated domain will automatically point to the IP address of the service ordered. Macros are supported in the template. Default template: @USERNAME@.example.com. Domain example: admin.example.com.
Domain template macros- @USERNAME@ — the username of the current account in BILLmanager.
- @TYPE@ — product type.
- @ID@ — service identifier.
Name server — select a name server for your free domain zone.
How to create a name server- Go to Integration → Name servers.
- On the toolbar, click Add.
- At the Processing module step, select ISPmanager 6.
- At the Integration settings step, enter the following data:
- Provider — a provider that provides name server services
- Name — the name of the name server in the interface with a specific localization
- URL — your ispmanager dashboard domain or IP address. Example: https://example.com:1500/ispmgr/
- Username — login of an existing account in the ispmanager panel that will provide name server services
- Password — the password of the existing account in the ispmanager panel that will provide name server services
- For free domain name — check the box to create free domain names.
- Click Finish.
PricesTo create a tariff plan, you must set a price for at least one payment period.
- One month — the cost of the hosting or its renewal for a month.
- Disable the "Monthly" period — check this box if you want to prohibit ordering hosting for a month.
- Three months — the cost of the hosting or its renewal for three months.
- One year — the cost of the hosting or its renewal for a year.
- Disable the "Yearly" period — check this box if you want to prohibit ordering hosting for a year.
- For three years — the cost of the hosting or its renewal for three years.
- Setup fee — additional charge when purchasing hosting.
- Renewal with special price — a separate price for renewing your hosting for a selected period. If you check this box, the following options are available:
- Renew for 1 month — the cost of renewing hosting for a month
- Renew for 3 months — the cost of renewing hosting for three months
- Renew for 1 year — the cost of renewing hosting for one year
- Renew for 3 years — the cost of renewing hosting for three years
PolicyAllow for client groups — customer groups that can order and change tariffs.
How to create a client group- Go to Clients → Client groups.
- On the toolbar, click Add.
- Set the required settings:
- Name — name of the client group
- Allow service suspension/activation — check this box to allow group clients to activate and suspend hosting service.
- Allow service deletion — check the box to allow clients in the group to remove hosting service.
- Ignore the number of services on client's account — check the box to override the policy for the Number of services available for order in the tariff settings.
- Click Ok.
- Forbid to client groups — groups of customers who cannot order or change their tariffs.
- Minimum order period — the minimum hosting service usage period after ordering. If this option is set, the following is available:
- Minimum period length — the number of days or months in the minimum order period.
- Number of services available for order — the number of hosting services available for order per client. If a client reaches the limit, ordering hosting services for this plan will be unavailable.
- Simultaneous services order — the client can add multiple services to the cart simultaneously. If you check this box, the following option will be available:
- Maximum number of services — the number of services added to the cart simultaneously. Large numbers of services ordered simultaneously may impact BILLmanager performance .
- Late renewal fee — a penalty for late hosting service renewal. The penalty is charged when the client renews the hosting service. Available values:
- Without fee — late renewal of a hosting service is not subject to a penalty
- Fixed amount — a fixed penalty amount is added to the renewal cost
Percent from the price for late renewal — a percentage of the cost of the overdue period is added to the cost of the renewal
ExampleA 50% fine is imposed for late renewal of a hosting service.
The hosting service expired on September 1, and renewal is scheduled for September 5.
To calculate the fine, the system will calculate the service cost for each day (even if the hosting service was purchased for a year). Let's say the fine is $0.1 per day. The late fee will then be calculated:5 days x $0.1 = $0.5
The total fine amount is $0.25, since the fine percentage is 50%.
Renew from suspension date — the service term will be calculated from the date of suspension, not the renewal date. This means the penalty is calculated based on the service term, not the monetary amount.
ExampleThe hosting service expired on August 3, and renewal is only available on August 15. After renewal, the hosting service will be activated until September 3, not September 15.
- Auto-deletion period — the number of days set for the automatic deletion of unrenewed hosting services. Leave blank to use the auto-deletion period specified in the Service type settings (Shared hosting). If the auto-deletion period is not specified in the service type, expired services will not be deleted.
- Suspend service on weekends — overrides the service shutdown policy. Available values:
- Use product type settings — the tariff will use the policies from the settings of the corresponding product type.
- Suspend services — tariff services will be stopped on weekends (Saturday, Sunday) if the client does not have a sufficient account balance to pay for the extension
- Do not suspend services — services under this plan will not be suspended on weekends (Saturday, Sunday) if client does not have a sufficient account balance to renew them. If there is a penalty for renewing a suspended service, funds for the additional days of service will be debited from the customer's account when paying for the service renewal.
- Tariff change policy — the billing policy used when changing a service's tariff. Available values:
- Change period — when changing the tariff, the validity period of the service will be recalculated upwards when switching to a cheaper tariff, or downwards when switching to a more expensive tariff
- Add funds/refund — when upgrading to a more expensive tariff, the customer will be required to pay the difference in price for the remaining service period. When downgrading to a cheaper tariff, the customer will be refunded the difference in price for the remaining service period.
- Tariff cannot be changed — switching to another tariff will be impossible
- Extra charge only, no refund upon downgrade — when switching to a higher plan, the customer will need to pay the difference in price for the remaining service period. When switching to a lower tariff, there will be no refund, but the customer will be able to use the previous plan without any additional payment.
- Full payment for a new tariff plan — the client will be charged the full cost of the new plan, and the service validity period will be calculated based on the selected order period from the date of the plan change.
- Renew from — the service renewal policy for a new tariff plan. Available values:
- current date — the service is extended from the current date.
- service expiration date — the service is extended from the expiration date.
- Renew from — the service renewal policy for a new tariff plan. Available values:
- Additional resources order policy — a method for calculating the cost of additional resources when ordering a hosting service during its validity period. To use this option, create and configure additional resources. Available values:
Price before a service expiration date — the cost of addons is calculated until the hosting service expiration date
ExampleThe hosting service is valid until November 30. Additional hosting service resources must be ordered on November 15. The cost of these addons will be calculated for 15 days only.
Full price over the whole period — the full cost of add-ons, regardless of the hosting service expiration date. The most recently paid or renewed hosting service period is selected for the addon.
ExamplesExample 1:
Additional resources are being ordered for the hosting service on November 10. Previously, the hosting service was purchased for a month until November 20. The add-ons will only be active for 10 days, but will be paid for at full price.
Example 2:
A customer used the service for three months, renewing it each time for a month. Seeing that the service was about to expire again, the customer renewed the service for another three months. After using the service for two months, they decided to order additional resources. If the Full price over the whole period option is used, the cost of the add-ons will be charged for three months. Even if there's one month left on the service, this will not affect the cost of the add-ons.
- Addon cancellation policy — cancellation of tariff plan add-ons. A refund for the remaining hosting service term or service removal without compensation is possible.
- Tariff plan end date — date after which it is impossible to order or renew the tariff.
- Notes — here you can add text notes about the tariff plan. Visible only to company employees.
Service order configuration- Sort — sorts tariffs from the list by priority. Sorting uses natural integers from 1 to N (the lowest number has the highest priority). If tariff values are the same, they are sorted alphabetically.
- Upload icon — an image for a specific tariff in the BILLmanager interface.
- Show addon icons — the rule for displaying icons for add-ons to the tariff plan.
- Tariff description — a plan description in the BILLmanager interface linked to the active localization. Markdown markup is available.
- Information for site — internal information required for integrating BILLmanager with your website. This information is only visible in the plan settings.
- Labels — a list of values required for customers to filter tariffs. Each value is specified in a new line.
- Click Finish.
To enable clients to order virtual hosting from ispmanager, please enable the tariff plan after creating it and configuring addons.
Tariff addons
Once you've completed setting up your tariff, additional resources will be automatically created for it:
- Traffic — the maximum amount of traffic consumed for a single hosting order. Default value: 5120 GiB
- Disk space — the maximum amount of disk space consumed for a single hosting order. Default value: 1024 MiB
- Web domain limit — the maximum number of web domains for a single hosting order. Default value: 10.
If necessary, edit existing or create new addons with resource types in the Products → Tariff plans → select a tariff plan → Config.
- Database
- IPv6 addresses
- Disk space
- Web domain limit
- Domain limit
- Email domain limit
- Maximum CPU load (CloudLinux)
- RAM
- Mailbox
- CPU time
- Public IPv4 addresses
- Traffic
All created addons will be automatically enabled.
Tariff activation
- Log in to BILLmanager with your administrator account at https://YOUR_DOMAIN/billmgr.
- Go to Products → Tariff plans.
- In the list, click on the imported tariff.
- Click Enable on the toolbar.
- Confirm the activation of the tariff.
If necessary, repeat the steps for all created tariffs.
After activating the tariffs, we recommend placing a test order for verification.
Test hosting order
To verify that the shared hosting plan is available to customers and orders are being processed correctly, please place a test order:
- Log in to BILLmanager with your administrator account at https://YOUR_DOMAIN/billmgr.
If you don't have a test client account in BILLmanager, create one.
How to create a client account in BILLmanager- Follow the billing URL specified in the provider settings.
- On the authorization form, click Register.
- In the registration form, enter the following details:
- Name — client’s full name
- Email address — login for client authorization in BILLmanager
- Password — password for client authorization in BILLmanager
- Re-enter the password — client password confirmation
- Country — client’s country of registration in BILLmanager
- Click Register.
Go to the client area.
How to access the client area in BILLmanager- Go to Clients → Clients.
- In the list, select the previously created client.
On the toolbar, click Log in.
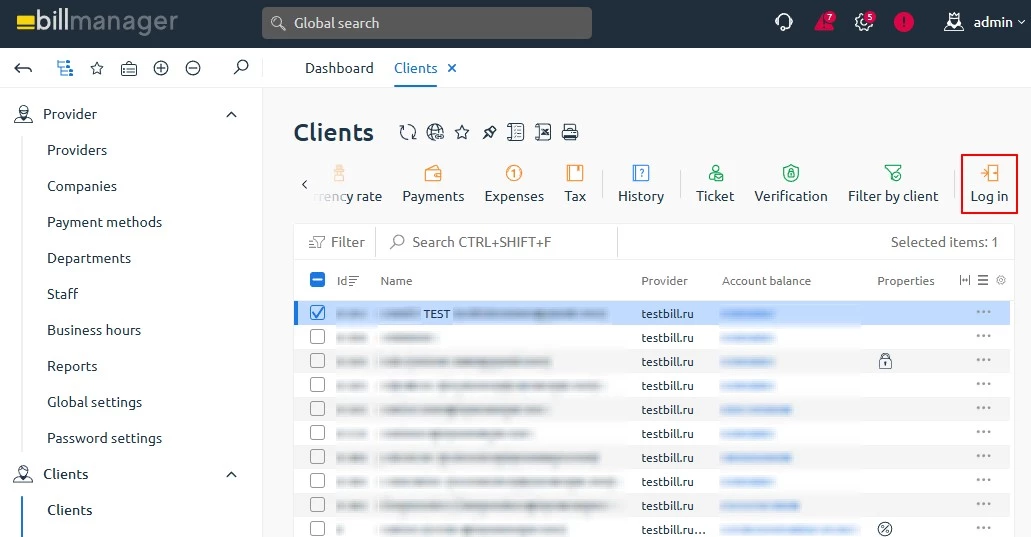
You will be automatically redirected to the client area.
Order virtual hosting in the client area.
How to order shared hosting in BILLmanager- Go to Licenses → Shared hosting.
- On the toolbar, click Order.
- Specify the order period and click Select.
- In the license block, click Order.
- Please provide your hosting registration details:
- Domain name — the name of the domain that will be created in the ispmanager panel.
- Disk space, MiB — the amount of disk space used as part of the hosting plan for a single order. Minimum: 1024 MiB . Maximum: 10240 MiB.
- Web domain limit, pcs. — the number of web domains included in the hosting package for a single order. Minimum value: 10 pcs. Maximum value: 100 pcs.
- Bandwidth, GiB — the amount of traffic used as part of the hosting plan for a single order. The default value is 5120 GiB . Rates will depend on the amount of traffic used.
- Confirm the selected payment period.
- If necessary, enable Auto-renewal for the paid service.
Click Enable or Pay.
Details- Enable — available when ordering a free service.
- Pay — available when ordering a paid service.
Select and set up the required payment method. Additional payer information (as a legal entity) may need to be verified.
Payer data validation- Beneficiary — the company receiving the payment.
- Bank name — the bank receiving the payment.
- BIC — BIC number.
- R/S — account number.
K/S — correspondent account number.
The payer is created separately or when ordering a license in the Clients → Payers section.
- Check the order contents and proceed with the payment.
- If successful, a notification will appear that says "Service is ready for use." To view and manage your license, go to Licenses → Shared hosting (available to clients and administrators).
- The license status will automatically change to Activation in progress. To change the status to Active, wait for confirmation from BILLmanager.
After activating the license, go to the ispmanager panel.
How to access the ispmanager panel from BILLmanager- In the BILLmanager navigation area, go to the Licenses → Shared hosting section.
- Select the hosting you ordered earlier from the list.
On the toolbar, click To panel.
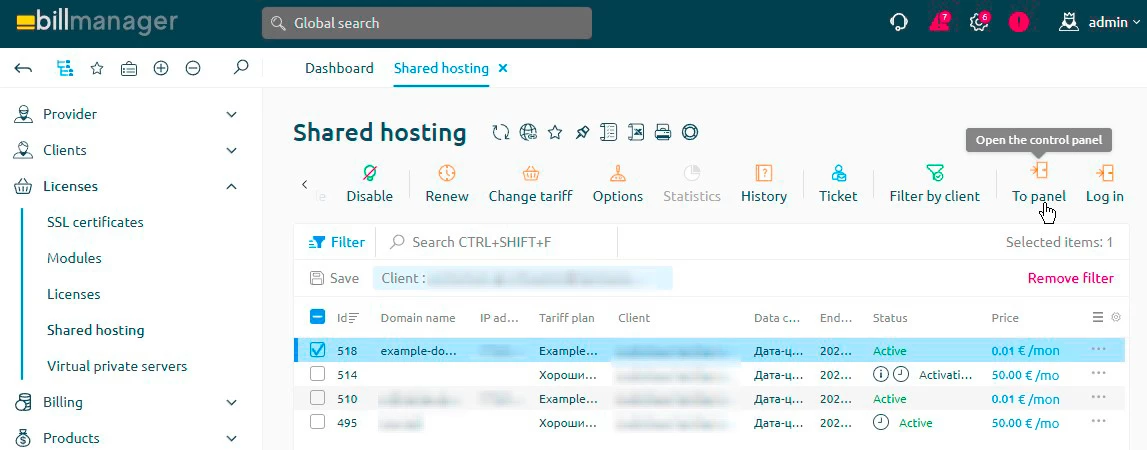
You will be automatically redirected to the ispmanager panel and logged in with the username generated when you ordered hosting.
In the panel, check the creation of new entities: whether the number of available units corresponds to the established limits specified in the tariff.
Additional user restrictions are available on CloudLinux OS.
If necessary, delete the test order.
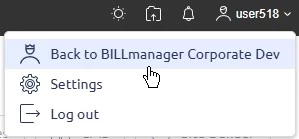
How to delete a test order in BILLmanagerReturn to the BILLmanager from the ispmanager panel.
- In the BILLmanager navigation area, go to Licenses → Licenses.
- Select the previously created license.
On the toolbar, click Delete.
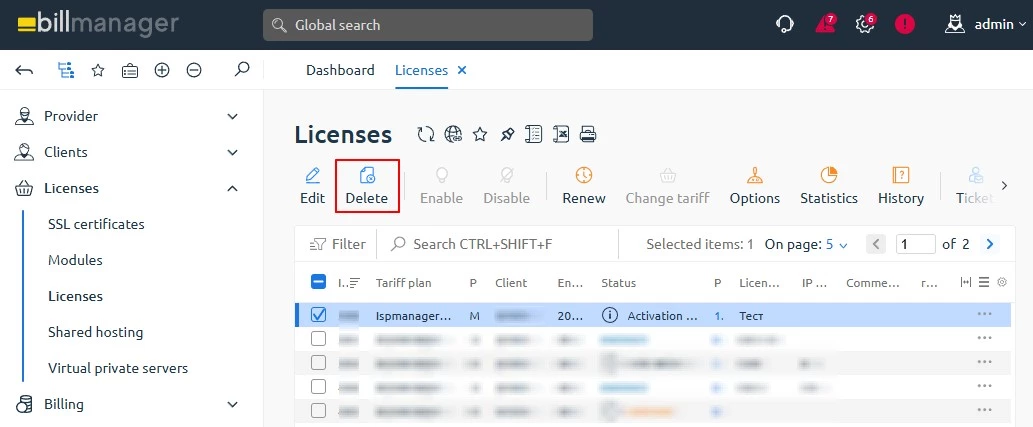
- Confirm license deletion.