Old user import: Data migration from Plesk to ispmanager via a backup copy
This instruction describes how to migrate data hosted on a server with the Plesk control panel to a server with the ispmanager control panel.
Get ispmanager for free when migrating from any other panel →
1. To ensure that the ispmanager server works efficiently, please install the recommended software. The verification and installation process is as follows:
Configure the recommended software. Go to Settings and select Software onfiguration.
Make sure the following components are enabled:
- Web server (WWW) — a web server configured in a similar or compatible configuration setup is mandatory;
- Mail server — needed to process email on the server;
- Name server — we recommend to choose PowerDNS for efficient management of DNS records, especially if the server hosts numerous sites;
- FTP server — provides the ability to transfer files to the server using the FTP protocol;
- DBMS (database management system) servers — needed to store and manage databases on the server;
- PHP Versions — ensure that the required PHP versions are installed to support applications and scripts;
- Additional software for compatibility — if necessary, install additional software to ensure compatibility with other system components.
2. If your OS is Cloudlinux, we recommend to learn more about specifics of panel operation with this OS.
3. For successful import to the server, it is required to provide five times the amount of free disk space compared to the size of the archive to be imported for the current user.
4. During import, it is recommended to disable password complexity check in the System settings section.
5. To successfully import databases for DBMS on the server with ispmanager, make sure that the default-authentication-plugin=mysql_native_password parameter is set in the configuration file. Use the following command to check if the the parameter is in the configuration file:
grep -ir "default-authentication-plugin" /etc/Exporting data from Plesk
Before importing data to ispmanager, we need to get a backup copy from Plesk panel first. Backups created at the administrator or user level are supported.
To download a backup copy from Plesk:
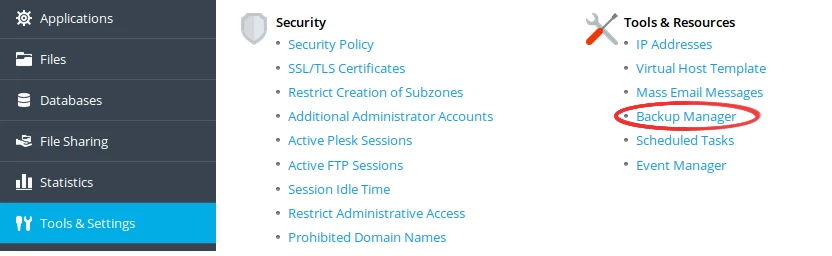
1. Authorize in the Plesk panel.
2. Go to Tools & Settings in the main section.
3. Click Backup Manager in the Tools and Resources section.
4. Click Back Up in the Backup Manager module.

5. In the Backup content form, select Full backup type. Enable the Exclude log files option to exclude log files and click OK. The backup will then appear in the list.
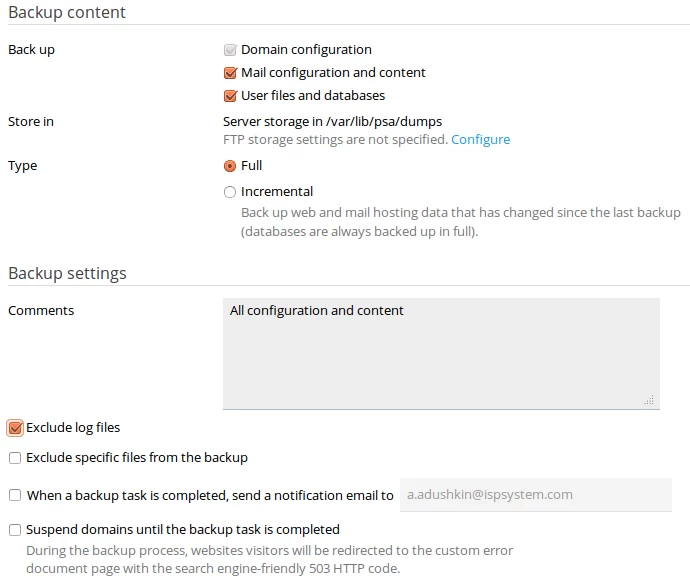
6. Download the Backup File form will appear. Disable the Use password protection option so that passwords are not encrypted. Click OK and the download of the backup will start.
Importing data to ispmanager
- Go to User import and select the Upload File source type.
- Specify the path to the file on your computer and click OK. If you want to import the contents of multiple archives, select the From local archive or directory source type. Then specify the path to the directory with the archives.
If the data import is performed at the Administrator level, all users contained in the archive will be imported and their restrictions will be applied.
If the data import is performed at the User level, the data will be imported only if the archive contains one user. Restrictions will not be applied.
Import logs
The log of user import in ispmanager is located in the file /usr/local/mgr5/var/backup2_plesk_conv.log.
If errors occurred during the migration, a warning message will be displayed. For a detailed description of the errors, click Details.
Transferable information
The following list of files and data can be migrated:
- Users with information about limits and features (SSL, Shell, etc.);
- User files;
- Schedulers;
- Domains;
- Resource records of domains;
- FTP users;
- Web domains;
- Mail Domains;
- Mailboxes, including contents;
- MySQL databases;
- Database users;
- SSL Certificates;
- CSR requests;
- Panel version data.