Working with Python
Python – a general-purpose programming language that can be integrated to run websites and applications.
To add a Python project, follow these steps:
Install Python
In order to add the ability to install Python to the ispmanager control panel, you must first install Nginx web server. Note that installing Nginx will change the configuration of the web servers. If you have already configured sites in ispmanager using the Nginx+Apache bundle, it is recommended to contact the developer of the sites to clarify the possibility of correct operation after Nginx installation.
To enable:
- In the Main menu select Settings.
- From the drop-down list select Software configuration.
- On the form that opens, select Python from the list and click on Install.
Once the installation is complete, Python will become available as a handler when you create the site.
Enable Python
- Python is disabled for users by default after installation.
- To enable, go to Users → Edit.
- On the Access tab, enable Can use Python.
- Set the default Python version in Default values tab.
- Press Save.
Default Python version can be configured in user templates.
Once enabled, additional steps are performed:
- Create a systemd unit to run the pm2 daemon under the user (if the user is active).
- Users with the ability to create Python websites are indicated by a green icon in the Status column.
Disable Python
To disable Python for a user:
- Open Users → Edit.
- On the Access tab, disable Can use Python checkbox.
- Click Save.
This feature cannot be disabled if a user has sites that use Python.
When the feature is turned off, the following will be performed:
- Installing the pm2 user daemon.
- Remove the systemd unit to run the pm2 daemon from under the user.
Add a Python project
Add your Python project to the created site by doing the following:
- In the Main menu select Sites.
- Select the required site and click on the Website files button.

- On the File Manager form that opens, click Upload.
- Select where you want to upload the files from:
- Local computer file – click on Choose file or move the necessary files to the drag-and-drop area
- File URL on remote server:
- URL – a link to the file to be uploaded, for example, http://example.com/dir/file.html
- File name – the name of the file to be saved with in the current directory. If you leave this field blank, the file name will be extracted from the URL
- Specify the required packages in the requirements.txt file.
- Click on Back to the list of websites arrow.
- Click on “…“ and select Installing Python packages.
Python will install all the specified packages of your project. The installation process is indicated by a gray Python icon in the Parameters column. - After installation is complete, click on the “…“ button and select Restart (Python).
The project will be restarted; the Python icon will turn green, which means the project is working properly.
If you have installed a Python package that requires Web server configuration:
- Configure the website by clicking Edit.
- Navigate to the Handler section and fill in the fields for Python web server.
- After filling in the fields, click on the Save button.
- If necessary, configure the installed Python package.
Functional check
To check if it works:
If the Unix family OS is installed on the PC, add the following entry to the /etc/hosts file:
1.1.1.1 example.comWhere:
- 1.1.1.1 — is the IP-address of your server;
- example.com — the website name;
If Windows OS is installed on the PC, add the following entry to the C:\windows\system32\drivers\etc\hosts file:
1.1.1.1 example.comWhere:
- 1.1.1.1 — is the IP-address of your server;
- example.ru — the website name.
Enter the name of the website in your browser to check if it was created correctly.
Configure user
Before importing users with Python, make sure that the target server has all the correct versions of Python installed.
Once Python is installed on the panel, add usage rights to the user under which Python projects will be added, to do this:
- In the Main menu select Users.
- Select the appropriate user and click on Edit.
- On the form that opens, find the Access section.
- Enable the Python checkbox and click the Save button.
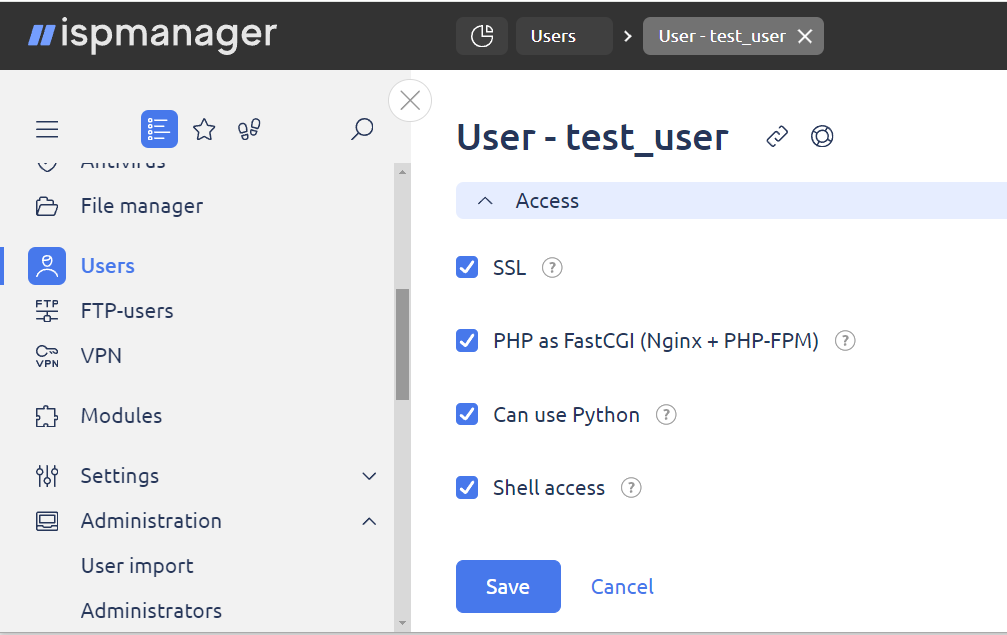
After saving, a Python icon will be displayed in the user Status column.
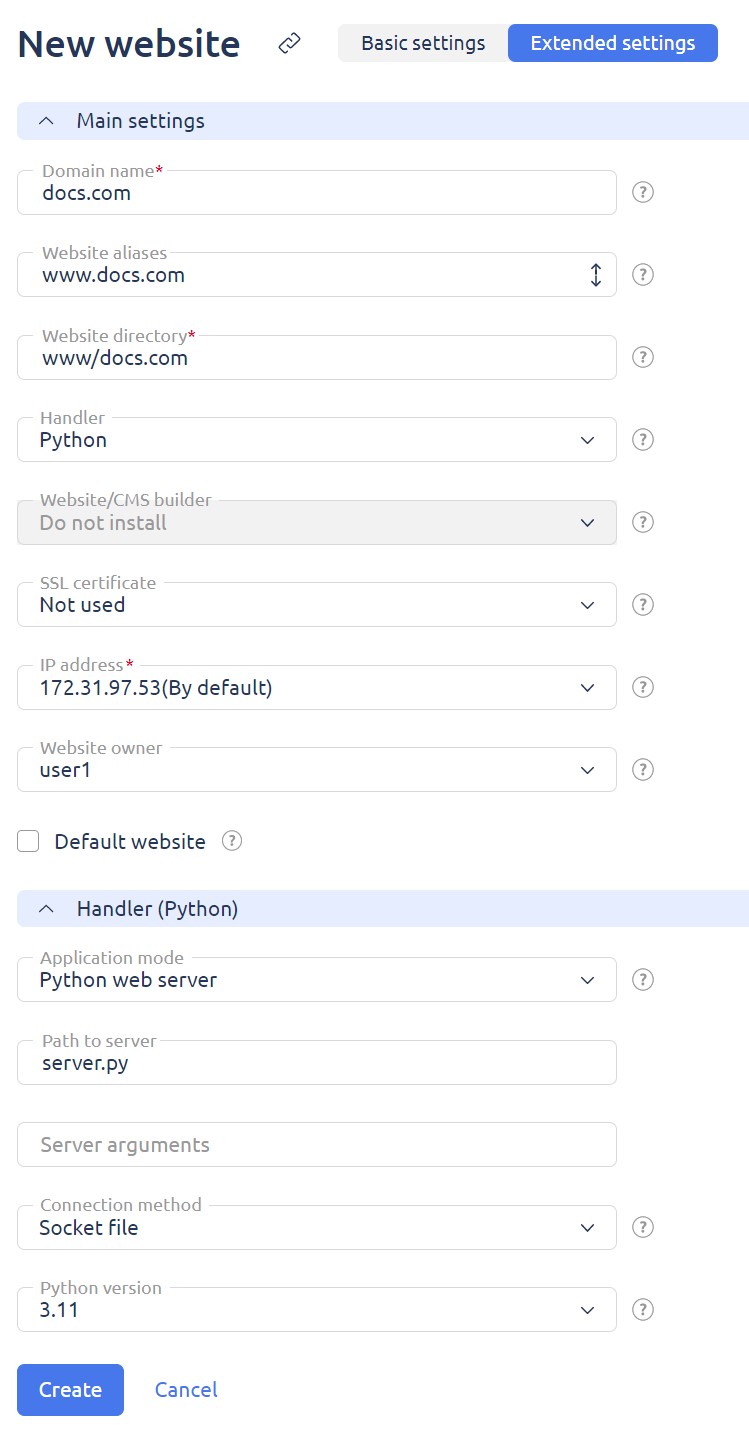
Create a website for a project with Python
Now you need to create a site with a Python handler, to do this:
- In the Main menu select Sites.
- On the form that opens click Create website.
- Select the Extended settings tab (for a detailed description of the settings, see Add a website) and fill in the required fields. Below are the important fields when creating a website with a Python project:
- Main settings section:
- Domain name – the domain name
- Website directory – the path to the website directory that is relative to the owner's home directory
- Website aliases – the names of the aliases you want to add to your website (optional field)
- Handler – select Python
- SSL certificate – select an SSL certificate that will be used for this website. You can specify the existing certificate or create a new self-signed certificate
- IP address – a list of IP addresses assigned to the website
- Website owner – select the website owner
- Default website (checkbox) – if the website is marked as default, it will process a request by the domain name which is not registered on this webserver (including requests by IP) to any IP address assigned to this website
- Handler (Python) section:
- Application mode:
- CGI (Apache + Python) – Python interpreter is called by Apache2, the code will be executed by accessing the file directly
- Python web server– some Python packages need server configuration (for example, Django). Configure after the appropriate package is installed:
- Path to server – the path to the application server file relative to the home directory of the website
- Server arguments – list of arguments that will be passed to the server at startup
- Connection method (method selection is only available when Python Web Server mode is selected):
- Port – free unprivileged port will be assigned to the website
- Socket file – the website will work via a socket
- Python version – select the required Python version.
- Application mode:
- Main settings section:
- Click on Create.
On the Sites page, the created website will be added with the Python icon in the Parameters column.
Edit website
- 1. Change the Python version. You can change the version of Python used for your web project depending on your requirements and compatibility.
- Change the CGI mode (Apache + Python). Switching between CGI and Python execution modes in Apache environment and vice versa provides flexibility in web application management.
- Switch the application mode from socket to port and vice versa. The ability to switch between socket and port operation ensures application optimization and efficiency depending on project requirements.
- Change the handler to PHP, Node.js or disable it. You can change the handler to PHP, Node.js or disable it completely depending on your development needs and preferences.
Disable website
To turn off the site, go to the Sites section and click the Off button. The user will see a stub. If the application was running in server mode, the Python server process will be shut down. It is important to note that no site data is modified or deleted during the shutdown process.
It is important to note that no site data is changed or deleted during the disconnect process.
Enable website
To activate the site, go to the Sites section and click the On button. After that, if the application is running in server mode, the Python process for the site will be started.
Relaunch of website
After making changes to the content of a site, if the application is running in server mode, you must restart the application for the changes to take effect. To restart, select Restart (Python) from the context menu of the desired site. Only the site process will be restarted.
Install packages
The command allows you to install the packages specified in the requirements.txt file located in the root directory of the site. To run the command, click on the desired site and select Install Python packages.
View packages
To view the installed packages for a site, click on the site and select Browsing Python packages. Clicking on the button will open a list of installed dependencies, containing buttons on the toolbar:
- Install - installs dependencies. Simultaneous installation of multiple dependencies of specified versions is supported;;
- Delete - removes the selected dependency.
Shell client
Shell client provides the ability to run additional Python, pip and other commands in the terminal. Shellinaboxd is started under the site owner. When the terminal is opened, the following actions are performed:
- Navigation to the website's home directory
- The path to the virtual environment for the selected site is added to the PATHvariable
To launch the shell client, press the Shell client button in the context menu of the chosen site.
Remove site
To delete a site, click the Delete button in the Sites section. The site content, Python settings, and data in the pm2 process manager will be deleted. The site process will be terminated.
Site list
A site that uses Python is marked in the Handler column with the string Python and the current version. For CGI mode, the word CGI is added before the version.

In addition, there are site status icons. The status can take the following values:
- The site is being installed.
- The site has been successfully launched. A tooltip displays the port or socket path used by the application.
- Site launch error.
- The site restart process is in progress.
- In the process of shutting down the site.
- The site is in the process of starting up.
- The site is shut down.
- The package installation process is in progress.
- The site is running in CGI mode.
Configuration files
Configuration files for Python applications include a requirements.txt file that pip uses to install dependencies. An example of such a file:
jinja2==2.11.3
jsmin==2.2.2
markupsafe==1.1.1
python-http-client==3.3.2
redis==3.2.1
The ecosystem.config.js file is available for editing configuration files in Python web server mode. To make changes, go to the Sites section, click Configuration files, and perform the necessary actions. The ability to edit these files is available to both administrators and users.
Uninstall Python
To remove Python support, follow these steps:
Go to Settings > Software configuration > Python > Uninstall, or click Edit, uncheck Python, and click Save.
If there are sites on the server that use Python, it will not be possible to uninstall it.
The following steps are performed when you uninstall Python:
- pm2 processes are terminated
- device files for pm2 autostart are deleted
- pm2 is deleted
- if node.js feature is not used, /usr/lib/ispnodejs directory is deleted