SSL certificates for mail domains
An email client connects to a server using a hostname—for example, `mail.domain.com`—and verifies that this name is included in the SSL certificate. By default, all mail domains use a shared Exim certificate issued for the server's hostname, which may cause the client to display a warning. To prevent this, you should assign a dedicated certificate to your mail domain.
For more information on mail server certificates, please refer to the article Main SSL certificate for Exim.
Preparing to install a mail domain certificate
Before installing an SSL certificate for a mail domain, ensure that the following conditions are met:
- the Exim and Dovecot mail servers are installed
- a user-owner of the mail domain has been created in the control panel
- the mail domain is registered and accessible online
- the A or AAAA record for the name specified in the certificate points to the IP address selected in the mail domain settings within the control panel; this refers to the mail domain name itself (if the certificate does not include an alias) or the alias name (if one is specified).
Methods for adding a certificate for a mail domain
There are two ways to add a certificate for a mail domain in the panel:
- generate a new one in the mail domain settings
- add your own certificate in the SSL certificates section
Regardless of the method used, the mail domain will begin using its own SSL certificate instead of the Exim certificate.
Issuing a new certificate
- Log in to ispmanager with the required account.
- Go to the Mail domains section.
 Add or
 Edit an existing mail domain.
- In the settings, check the box for Secure connection (SSL).
- Enter the required information:
Certificate alias — the name for which the certificate is being issued. This same name should be used as the IMAP, POP3, and SMTP server address in your email client. The default format: mail.MAIL_DOMAIN_NAME. Example: mail.domain.com.
DetailsThe server selects a certificate based on the name the client uses to connect. If the client connects using a different name or an IP address, it will receive the Exim certificate. In this case, either specify the server address in your email client so that it matches the alias, or change the alias and reissue the certificate.
- SSL certificate:
- Email — the email address of the certificate owner to send notifications to
- Click Create or Save.
Adding an existing certificate
- Log in to ispmanager with the required account.
- Go to the SSL certificates section.
- On the toolbar, click Add a certificate.
Select the certificate type:
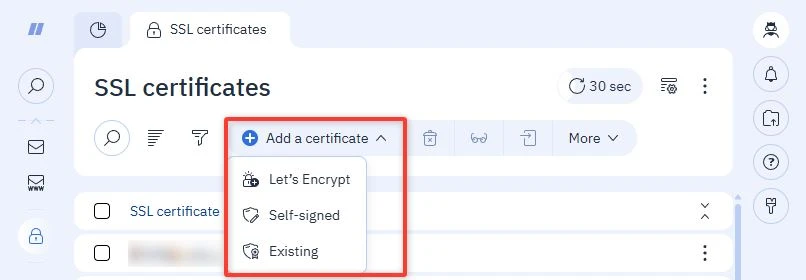
- Let's Encrypt
- Self-signed
- Existing
Fill in the details. Specify the user who owns the email domain as the owner. The name in the certificate must match the alias used for the certificate—for example, mail.domain.com.
If an alias is not used, the certificate name must match the name of the mail domain.
- Click Create.
Go back to the mail domain settings and select a certificate from the SSL certificates list.
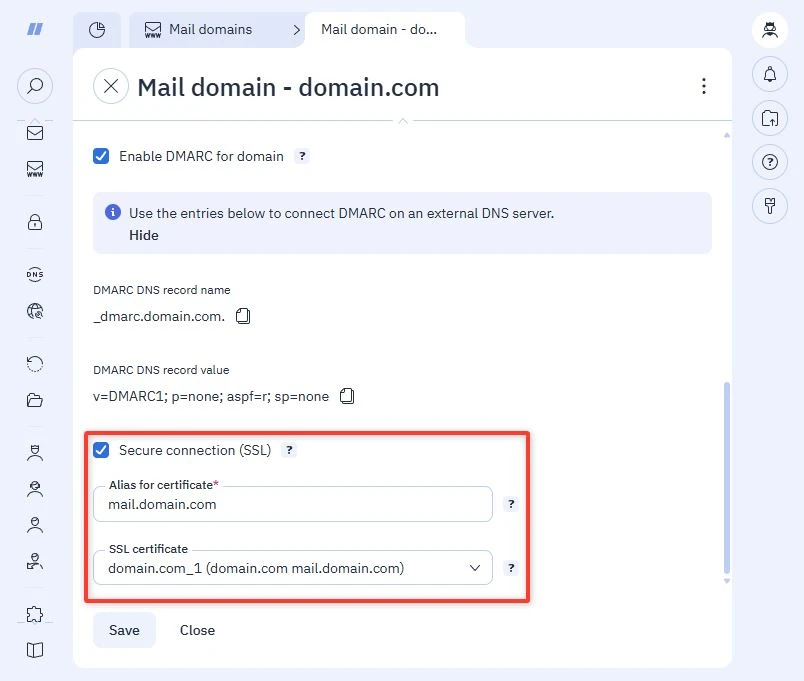
- Save the changes.
Disabling and deleting a mail domain certificate
If a certificate is linked to a mail domain, it can only be disabled. To do this, go to the mail domain settings, uncheck the Secure connection (SSL) option, and save the changes. Then, the certificate will be available for deletion.
To delete a certificate, navigate to the SSL certificates section, select the desired certificate, and click  Delete on the toolbar.
When the user who owns a mail domain is deleted, all associated entities—such as DNS records and the domain itself—are also automatically removed.
Mail domain certificate files
All SSL certificates activated for a user are stored in the directory: /var/www/httpd-cert/USER.
After editing or creating a mail domain, the certificates are activated as follows:
| RHEL-based OS | Debian-based OS | |
| Exim certificate | /etc/exim/ssl/ALIAS.crt | /etc/exim4/ssl/ALIAS.crt |
| Exim certificate | /etc/exim/ssl/ALIAS.key | /etc/exim4/ssl/ALIAS.key |
| Dovecot certificate URL |
Details The link format in the panel: Where | |
| Dovecot key URL |
Details The link format in the panel: Where | |
| Dovecot configuration |
Details Configuration file entry format: | |