Install an SSL certificate
SSL is a protocol for encrypting data transfer between a user's browser and a website. This protocol allows for the secure exchange of personal data with a specific web resource.
Data is encrypted using a pair of unique digital keys: a public key and a private key. The public key is visible to everyone, while the private key is visible only to the website owner. An SSL certificate confirms that the keys belong to a specific website. The authenticity of these keys is verified by a certification authority, which issues certificates.
Installation requirements
All certificate types require the domain to be pointed to the server running the ispmanager panel.
Adding an SSL certificate
When adding an SSL certificate after specifying the domain name, use only Latin characters.
There are two ways to install SSL certificates in the ispmanager panel: through the Sites and SSL certificates sections:
In this section, you can:
- link a certificate to a website so it can be used immediately.
- quickly issue a certificate and switch between certificates while editing a website.
- easily track the certificate status for each specific website.
In this section, you can create, store, view, delete, renew, and replace certificates for any website.
To add a certificate separately from a website:
- Log in to ispmanager with a user-level account or above.
- Go to the SSL certificates section.
- On the toolbar, click
 Add certificate.
 - Select the required option:
- Fill in the details.
- Save the changes.
To make the certificate active for your website, install it in the settings.
Types of SSL certificates
Let`s Encrypt
For more information about Let`s Encrypt and its configuration details, see the Let`s Encrypt certificates article.
Self-signed
A self-signed certificate is a free certificate that is created and signed directly on the server. There is no third-party trusted authority to verify authenticity of this certificate. This type of certificate does not have much credibility among browsers. It is valid for one year from the date of creation and is automatically renewed upon expiration. Suitable for use on a local or test server.
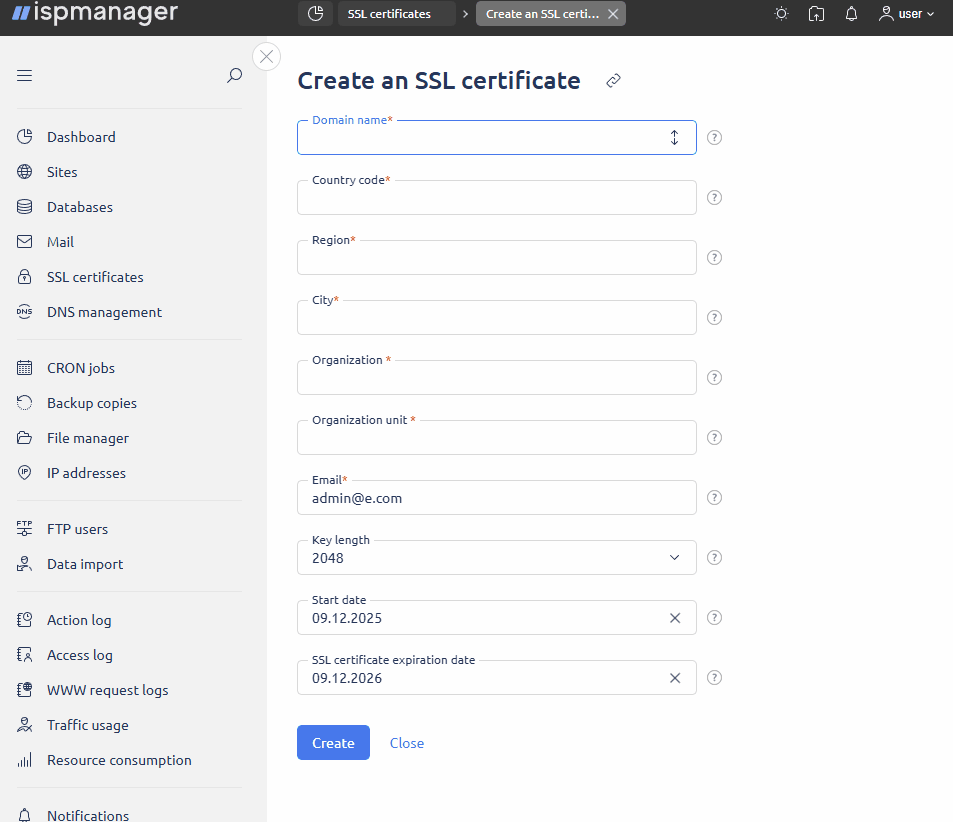
To create a certificate, fill in the required fields:
Existing
An existing certificate is purchased from a certificate authority. It is fully trusted by browsers. Suitable for any commercial, corporate, or government portals. The validity period depends on the purchased lifespan of the certificate.
When adding a certificate, fill in the following fields in the panel:
- Username — select the ispmanager user the SSL is being created for. This option is not available to user-level accounts.
- SSL certificate — enter the contents of the domain certificate in PEM (.crt) format.
- SSL certificate key — enter the certificate key in PEM (.key) format.
SSL certificate chain — enter the certificate chain in PEM (.ca-bundle) format. If the certificate authority did not provide a certificate chain, generate one yourself.
If the certification authority provided files in a different format, change the file format manually.
SSL certificate functionality check
After adding the SSL certificate, we recommend checking its functionality in one of the following ways:
- in the Sites section for the domain, the SSL column displays a symbol

- on the website page, the URL in the address bar begins with https://
- on the website page, a lock or shield icon is displayed next to the URL
Technical details
SSL certificate files
By default, all SSL certificates added for a user are placed in the directory /var/www/httpd-cert/USERNAME.
The name of the issued certificate in the panel changes depending on the type of certificate:
| Let`s Encrypt | Existing and self-signed | |
|---|---|---|
| Template | CERTIFICATE_NAME_le_NUMBER | CERTIFICATE_NAME_NUMBER |
| Example | example-crt_le1 | example-crt_1 |
SSL certificate logging
Among certificate types, logging is supported for for Let's Encrypt.
For self-signed and existing certificates, general information about creation and addition is recorded in the following directories:
/usr/local/mgr5/etc/ispmgr.conf— ispmanager's main configuration file/usr/local/mgr5/var/ispmgr.log— ispmanager's main log