Control panel addresses and SSL certificates
Control panel address
By default, the ispmanager panel can be accessed at https://IP-ADDRESS:1500/ispmgr. You can change the panel's address, configure access at multiple addresses and ports, or install an SSL certificate.
Adding new addresses
- Log in to ispmanager with an administrator-level account or above.
- Go to the Panel settings section.
Click Add in the Panel address section.

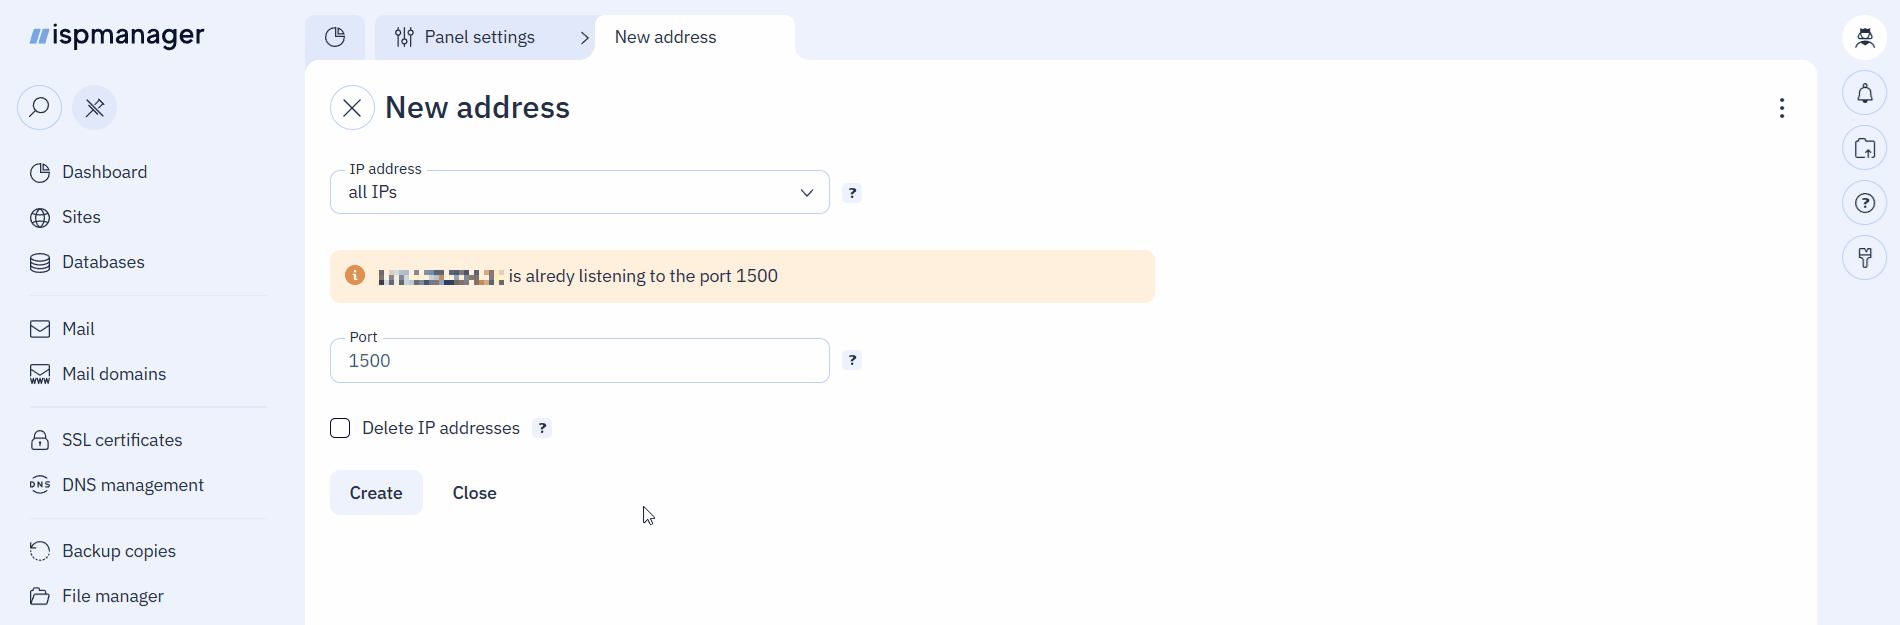
Fill out the fields:
- IP Address – specify the IP address where the incoming connections will be received. IP addresses added in the IP addresses section are available for selection.
- IP ADDRESS — panel will be accessible at the specified address.
- All addresses — panel will be accessible at all IP addresses that already exist in the IP addresses section or will be added in the future.
Port – specify the port number that will be used for incoming connections. If left blank, the default port 1500, will be used. When adding all addresses, if the specified port is already listening on one or more addresses, remove them:
Changing port 1500 to another port may make the panel unavailable. Before changing, open the required port in your firewall rules.
If you need to specify port 80 or 443If your control panel doesn't have web servers installed and you don't plan to host websites, you can configure access to the control panel via ports 80 and 443. In this case, the control panel will open in a browser using the domain or IP address without specifying a port.
For HTTPS access, specify port 443 and add an SSL certificate to the control panel address.
For HTTP access, specify port 80 and configure HTTP access.
- IP Address – specify the IP address where the incoming connections will be received. IP addresses added in the IP addresses section are available for selection.
- Click Create.
Once added, the address will appear in the Panel address section. If all addresses have been added, only the default address will appear in the list.
Changing addresses
Changing an already created address is not possible; set up a new panel address and then delete the old one.
Change the server's primary IP address will change the IP address for all panel entities.
SSL Certificates for the panel
Default SSL certificate
Upon installation, a self-signed certificate is automatically issued for the server hostname. If the server's IP address is public, a Let's Encrypt certificate is also issued for the IP address during installation, and the self-signed certificate is replaced with the Let's Encrypt certificate.
On existing panels, upgrading to version 6.139 also issues a Let's Encrypt certificate for the server IP address, except in the following cases:
- a certificate for the panel has already been issued; in this case, the certificate that is already issued will be used.
- a domain is used to log in to the panel; a self-signed certificate will be used until a certificate for the domain is issued.
- the panel's IP address is non-public; a self-signed certificate will be used.
The self-signed certificate is valid for 10 years, and the Let's Encrypt certificate for the IP address is valid for 6 days. Both self-signed certificate and Let's Encrypt certificate are installed and renewed automatically.
You can also issue a new Let's Encrypt certificate for the panel or add an existing one manually. To renew an existing certificate, you will have to issue and add it again every time.
Adding new certificates
If you have configured access to the panel by domain, the certificate for this domain must be issued via the Sites or SSL certificates section.
- Log in to ispmanager with an administrator-level account or above.
- Go to the Panel settings menu section.
Click Add in the SSL certificates section.
On the New certificate form that pops up, in the Certificate type field, select the type of certificate you will be ordering. Required fields are marked with asterisks.
A certificate can be issued for each panel address received from the server.
- Certificate domains/IP addresses* — the IP address or domain name the certificate will be issued for. If an IP address is specified, it must match the ispmanager panel IP address selected from the list below. If a domain is specified, it must be directed to this IP address.
- IP address* — the panel address the certificate will be bound to. If an IP address is specified in the field above, the address must match it; if a domain name is specified, the address must match that name.
- Certificate domains/IP addresses* — the domain name the certificate was issued for. The value is automatically populated from the certificate.
- IP address* — the address of the control panel the certificate is bound to. If the certificate was issued to an IP address, the IP address must match the address of the panel; if it was issued to a domain name, the address must match the domain name.
SSL certificate* — a certificate in PEM format from a file with the .crt extension, starting with the line "-----BEGIN CERTIFICATE-----" and ending with the line "-----END CERTIFICATE-----".
If the certification autority provided certificates in a different format, convert them to PEM.
- SSL certificate key* — a certificate key in PEM format from a file with the .key extension, starting with the line "-----BEGIN RSA PRIVATE KEY-----" and ending with the line "-----END RSA PRIVATE KEY-----".
- SSL certificate chain — a chain of SSL certificates in PEM format from a file with the .ca-bundle extension or created manually.
- Save the changes.
Deleting certificates
To delete a certificate, go to the Panel settings → SSL certificates section, find the desired certificate, and click Delete.
After deleting the Let's Encrypt certificate or an existing one, the panel will use the self-signed certificate issued during installation.
Technical details
When a new panel address is added to the ihttpd web server configuration file /usr/local/mgr5/etc/ihttpd.conf, a new listen section is added.
listen {
       ip IP-ADDRESS
	sni {
		domain_cert etc/manager.crt
		domain_key etc/manager.key
		domains IP-ADDRESS
	}
	rewrite
#	allow_origin https://IP-ADDRESS:1500/ispmgr
}
listen {
	ip IP-ADDRESS_1
	port 1500
	redirect
}
Panel certificate issue log
The Let's Encrypt certificate issuance process is recorded in the /usr/local/mgr5/var/ispmgr_acme_sh.log log.
Certificate files
Certificate files for the panel are stored in the /usr/local/mgr5/etc/ directory:
- The self-signed certificate is saved in the
manager.crtandmanager.keyfiles. - After issuing a Let's Encrypt certificate or installing an existing one, the self-signed certificate is saved in files named
manager.crt.bakandmanager.key.bak, and the new certificate is saved in themanager.crtandmanager.keyfiles. - Subsequent Let's Encrypt certificates are saved in files named
ihttpd_lets.crtandihttpd_lets.key. - Existing certificates are saved in files of the form
ihttpd_custom.crtandihttpd_custom.key.
ihttpd configuration file
When a certificate is issued, an sni section is added to the ihttpd web server configuration file /usr/local/mgr5/etc/ihttpd.conf , which specifies the paths to the certificate files. A section is added for each control panel address the certificate was issued to. If certificates are issued to a domain and an IP address, two sni sections are created for each address.
listen {
       ip IP-ADDRESS
	sni {
		domain_cert etc/manager.crt
		domain_key etc/manager.key
		domains IP-ADDRESS
	}
	sni {
		domain_cert etc/ihttpd_lets1.crt
		domain_key etc/ihttpd_lets1.key
		domains DOMAIN
	}
	rewrite
#	allow_origin https://IP-ADDRESS:1500/ispmgr
}
listen {
	ip IP-ADDRESS_1
	port 1500
	redirect
	sni {
		domain_cert etc/ihttpd_lets.crt
		domain_key etc/ihttpd_lets.key
		domains IP-ADDRESS_1
	}
}