Cloning project from Git-repository
The Git module copies a project from a Git repository to a server running ispmanager and publishes it on a website. You can connect repositories from any Git-based system, provided they are accessible via HTTPS or SSH. The examples in this article are based on GitHub.
How Git module works
Once a project within a Git repository is ready for testing or publication, you connect the repository to ispmanager. The control panel then automatically delivers the project to your website.
The project exists in three copies:
- remote repository — stored in your Git-based system (e.g., GitHub). This is where you write and save your code
- working directory — a copy of the repository located on the server running ispmanager. The control panel updates it with the Pull command
- deployment directory — the directory from which the website serves files to visitors. The control panel updates it with the Deploy command
The project deployment process consists of four stages:
1. You provide the repository URL, the branch, and access credentials (if the repository is private).
2. The control panel clones the project from the repository into the working directory.
3. The control panel executes deployment commands: it builds the project (if build commands have been specified), copies files to the deployment directory, and restarts the application if necessary.
4. The site is ready. For new sites, the control panel issues an SSL certificate.
When you make changes to the repository, they are applied to the site in one of two ways:
- automatically — the control panel receives a notification from the Git system via a webhook and updates the site itself
- manually — using the controls provided in the panel interface
All commands are executed on behalf of the user-owner of the site.
Git module requirements
- ispmanager plan: lite, pro, or host
- ispmanager version: 6.153 or higher
- access level: user
Installed utilities:
gitHow to check ifgitis installed- Log in to the control panel with an administrator-level account or above.
- Go to the Software configuration section.
- Find Git in the list.
If the utility is installed, a checkmark will appear in the Status column. If it is not, select Git and click the
 icon on the toolbar.
Installing Git module
The module is installed automatically when the panel is installed with the recommended software, or during a panel update, provided that the git utility is installed on the server.
If the module is missing, install it manually:
- Log in to the control panel with an administrator-level account or above.
- Go to the Software configuration section.
- Select Git from the list.
- Click on the toolbar.
Access to the Git module will be enabled by default for the www-root user. For other users, please enable the module by following the provided instructions.
Enabling Git access for user-level accounts
If the user belongs to a reseller, enable Git access for the reseller first.
- Log in to the control panel with a reseller-level account or above.
- Go to the Users section.
- Select a user from the list.
- On the toolbar, click
 .
- In the Access section, check the Git repositories box.
- If the user requires custom deployment commands, enable the Shell client option for them.
- Save the changes.
Connecting a repository to a site
A repository can be connected:
- to a new site during its creation — if you need to deploy a project to the site's root directory
- to an existing site — if you need to deploy a project to a directory other than the root, or if you want to connect an additional repository
You can connect multiple repositories to a single site, and the same repository can be connected to multiple sites.
To connect a repository:
- Go to the Sites section.
Select the site which you want to connect the repository to:
On the toolbar, click Create site → Git.
Select a site from the list, open its context menu by clicking
 and select Git repositories. Then, on the toolbar, click
 Create.
- Fill in the fields and save the changes. Required fields are marked with an asterisk.
Fields for a new site only:
- Domain name* — the name used by visitors to access the site.
- Site owner* — the user on whose behalf the site operates.
- Handler* — a program that executes the site's scripts. The available options depend on the installed software.
- Handler version — the version of the selected handler.
Repository access:
- Repository URL* — he address of the repository. For HTTPS:
https://GIT_SYSTEM_DOMAIN/PATH_TO_REPOSITORY.git. For SSH:git@GIT_SYSTEM_DOMAIN:USER/REPOSITORY.gitorssh://git@GIT_SYSTEM_DOMAIN/USER/REPOSITORY.git. - Repository name* — the name as it appears in the Git system.
- Branch — the branch to be cloned. If left blank, the default branch will be cloned.
- Public repository — select this if no authorization is required for read access.
Authorization required — select this for a private repository and choose an authorization method:
This authorization method is suitable for Russian-based Git systems that do not require two-factor authentication, as well as for Git servers located within private networks.
This authorization method is compatible with GitHub, GitLab, and Bitbucket.
Click Authorize in the banner located below the Authorization required field and grant Ispmanager access to your account on the Git system.
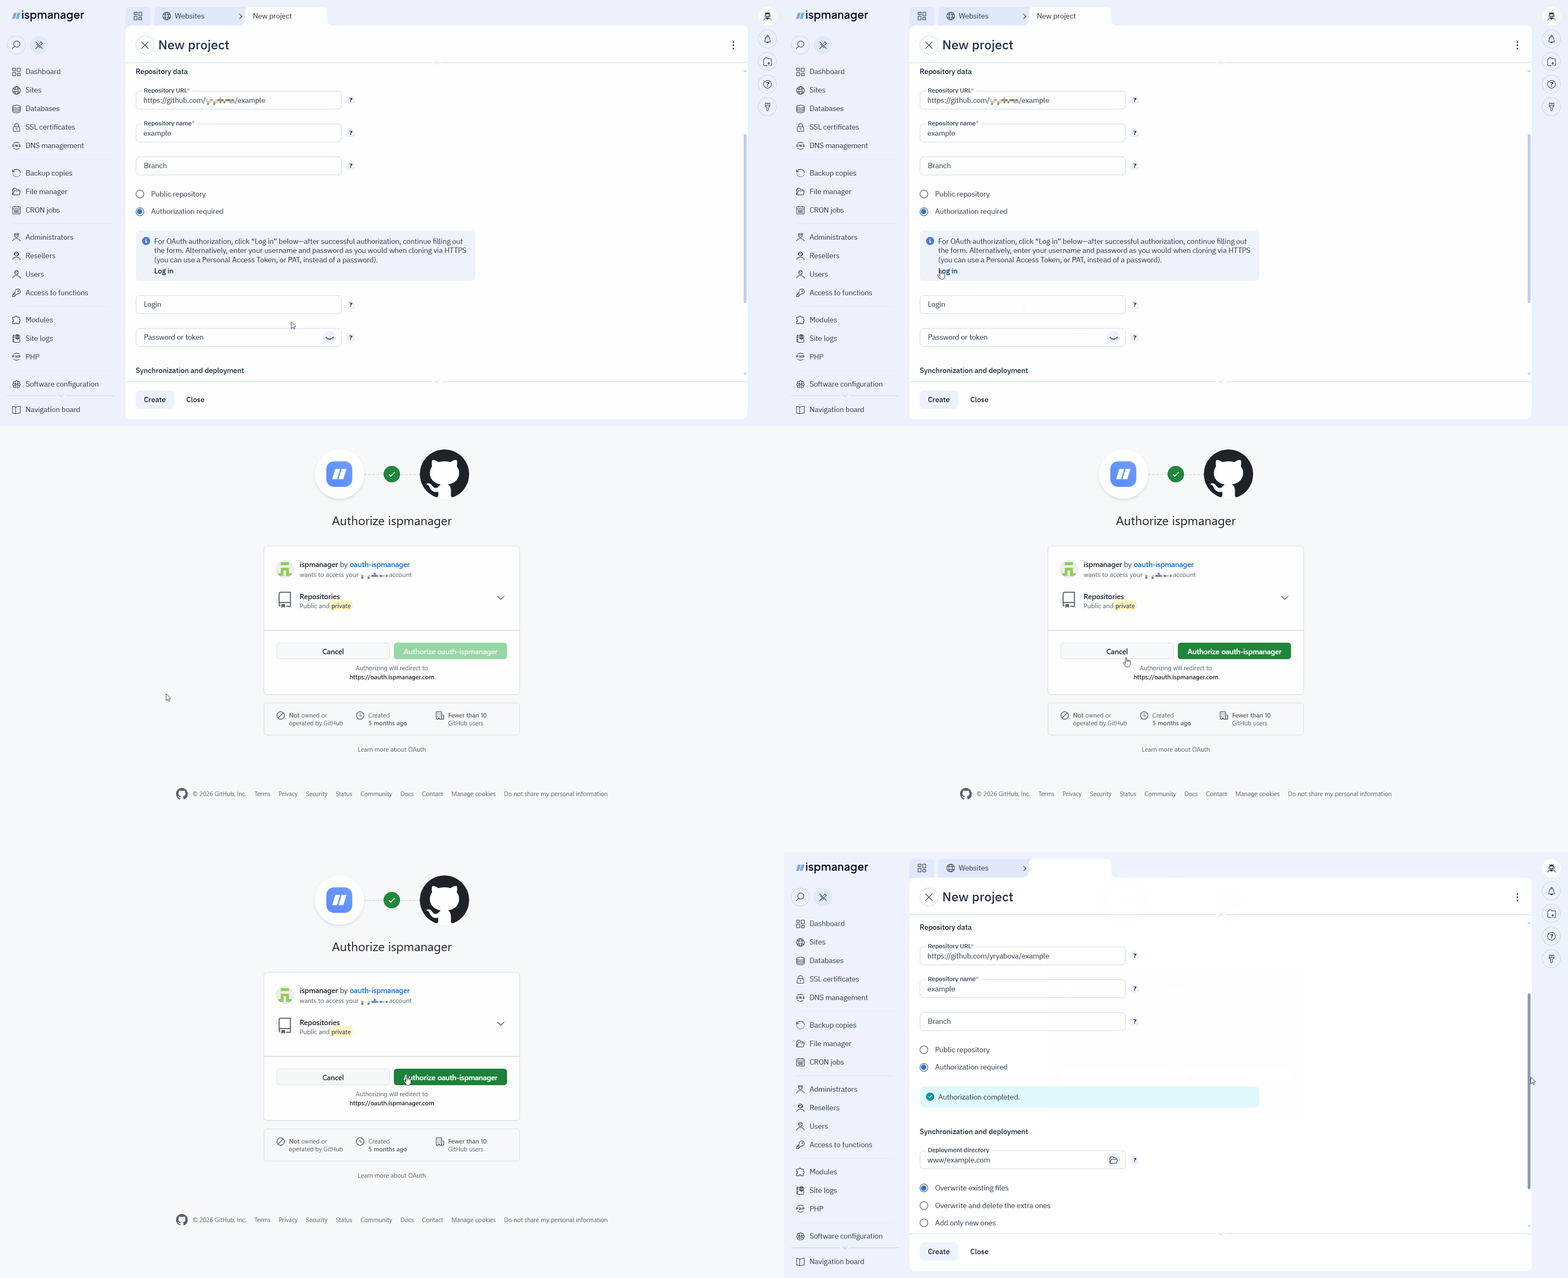
The authorization token is stored in the panel in an encrypted format and is updated automatically when it expires.
If a token expires, it must be reissued manually.
This authorization method is supported by popular Git systems such as GitHub, GitLab, Bitbucket, etc.
To authorize, fill in the following fields:
- Login — the username or email address associated with your account on the Git system.
Password — the token generated within the Git system.
How to generate a token- Log in to GitHub.
- Click your profile icon in the top-right corner.
- Go to Settings → Developer Settings.
- In the left-hand menu, select Personal Access Tokens → Fine-grained tokens.
- Click Generate new token and fill in the fields:
- Token name — a custom name for the token
- Expiration — the token's validity period:
- 7/30/60/90 days
- Custom — a custom validity period
- No expiration
- Repository access — the repository or repositories the token will have access to:
- Public repositories — public repositories (read-only access)
- All repositories — all existing and future repositories (public repositories will be read-only accessible)
- Only select repositories — only the repositories you check in the list.
- Permissions — access rights. Click Add permissions and select Contents (access to code: files, commits, branches, tags). In the Access level field, set Read-only access level for Contents.
- Click Generate token.
- Copy the generated token. GitHub will not display it again.
- When the token expires, generate a new one; otherwise, access to the repository will be blocked.
Once you have specified the repository address in SSH format, the control panel will automatically generate an SSH key. Copy this key and add it to the settings in your Git system before saving the configuration form in ispmanager.
How to add an SSH key- Log in to GitHub.
- Navigate to the desired repository.
- On the toolbar, click
 Settings.
- In the menu on the left, select Deploy Keys.
- Click Add deploy key and fill in the fields:
- Title — enter a name of your choice for the key
- Key — the key you copied from ispmanager
- Allow write access — leave unchecked
- Click Add key.
Synchronization and deployment:
- Deployment directory* — the directory for website files, specified relative to the owner's home directory. You cannot specify the home directory, the
~/.gitrepodirectory, or a directory belonging to another repository. If the repository contains anindexfile (orpackage.jsonfor Node.js projects), the control panel will remove the defaultindex.htmlplaceholder file. - Existing files* — actions to take regarding files already present in the deployment directory:
- Overwrite existing files — files with the same names will be replaced by those from the repository, while others will remain. Choose this option if the directory contains necessary files that are not present in the repository.
Overwrite and remove extraneous files — files with the same names will be replaced, and all other files will be deleted. Choose this option if the contents of the directory should exactly match the contents of the repository.
Files not present in the repository will be permanently deleted.
- Add only new files — existing files will remain unchanged; only missing files will be added. Choose this option if you want to preserve the current versions of your files.
Automatic synchronization — files are copied to the ispmanager environment after every
pushoperation. To facilitate this, the control panel creates a webhook.How to add a webhook to a Git systemYour Git system must have access to the control panel via port 1500. The webhook is created once the form is saved.
The webhook URL contains a secret token. Do not share it publicly—for example, in support tickets, chats, or screenshots—and do not disclose it to unauthorized parties.
Copy the webhook from ispmanager:
- Log in to the control panel using the appropriate account.
- Go to the Sites section.the "Change the Git repository parameters" icon
- In the context menu for the desired website, select Git repositories.
- Select the required repository and click on the toolbar.
- Copy webhook URL.
Add it to your repository settings:
- Log in to GitHub.
- Navigate to the desired repository.
- On the toolbar, click Settings.
- In the menu on the left, select Webhooks.
Click Add webhook and fill in the fields:
- Payload URL — paste the copied webhook URL.
SSL verification — if the control panel uses a Let's Encrypt certificate or a certificate from another certificate authority, keep the Enable SSL verification option selected. If a self-signed certificate is used, select Disable.
Disabling SSL verification reduces level of security. Install a certificate from a certificate authority to the panel.
Leave the remaining fields unchanged. The panel does not validate the webhook secret, the request body, or the event type: any change in the branch triggers an update in the panel.
- Click Add webhook.
- Automatic deployment — after each synchronization, files are published on the site.
Deployment commands — custom publish script. The field is available if the site owner has shell client access enabled. Without a script, the files are copied by the built-in
rsyncutility.How to write a custom deployment commandExample of a script template:
set -e
rsync -a --exclude=.git "./" "/var/www/USER/data/www/SITE/DEPLOYMENT_DIRECTORY" #ispmgr-managed-publish
set -ecauses the script to terminate upon encountering the first command that returns an error. The deployment is then marked as failed, and the file copying process does not take place.rsynccopies files from the working directory to the deployment directory. This command is linked to the Deployment directory and Existing files fields; changing the values in these fields updates the command, and modifying the command updates the fields.If the line containing
rsyncis removed, the Deployment directory and Existing files fields will disappear from the form, file transfers will have to be manually added within the script.
Add build commands—such as
npm ciorpip install—before thersyncline. This ensures that both the built files and the source code are deployed to the site.The script is passed to the
stdinof theshshell without the use of temporary files. The control panel automatically prepends the paths for the required versions of Node.js or Python to thePATHvariable, ensuring that the correct versions ofnode,npm, andpipare executed. You can use process management tools, such as pm2, to restart the site. The script has a maximum execution time of 30 minutes; if this limit is exceeded, the deployment will be marked as failed, and the entryDeploy timed out after 1800 secondswill be added to the log.
Once the form is saved, ispmanager clones the repository and deploys the files to the deployment directory. Deployment always occurs immediately after cloning, even if you have not configured automation. A free Let's Encrypt certificate is issued for a new site; if this is not possible, a self-signed certificate is installed instead. No database is created for the site. The new site appears in the list with a  icon.
Manual site update
- Go to the Sites section.
- In the website's context menu , click Git repositories.
- Select the repository from the list.
Click
 Pull on the toolbar to fetch changes from the remote repository.
The Pull operation overwrites any changes made to the working directory on the ispmanager server. Always edit your project exclusively in the remote repository.
- Click
 Deploy to publish the files to the website.
Viewing the commit history
- Go to the Sites section.
- In the website's context menu , click Git repositories.
- Select the repository from the list.
- On the toolbar, click
 Commit log.
The log is generated based on the working copy and contains the 50 most recent commits.
Troubleshooting
- Go to the Sites section.
- In the website's context menu , click Git repositories.
- Select the repository from the list.
- On the toolbar, click Deployment log.
It contains records of synchronization, cloning, and deployment errors.
Common errors and how to resolve them:
| Log entry | Cause | Solution |
|---|---|---|
Remote branch … not found | The specified branch does not exist in the repository | Check the Branch field in the repository settings |
Authentication failed | Incorrect username, password, or token, or the token has expired | Verify the repository access credentials in the settings; if necessary, create a new token within your Git system. |
Permission denied (publickey) | The SSH key has not been added to the repository | Add the SSH key from ispmanager to the repository settings in your Git system. |
Removing repositories
- Go to the Sites section.
- In the website's context menu , click Git repositories.
- Select the repository from the list.
On the toolbar, click
 .
Deleting a repository also removes the deployment log and the working copy. Files in the deployment directory remain.
When a site is deleted, all of its repositories—along with their working copies—are removed.
Technical details for Git module
Working directory: /var/www/USERNAME/data/.gitrepo/REPOSITORY_ID, where REPOSITORY_ID is an identifier from the gitrepo table.
Tables in the panel's database:
gitrepo— repository settings, cloning and deployment statuses, webhook tokensgitrepo_log— deployment log
Technical log: /usr/local/mgr5/var/gitctl.log
Deleting Git module
- Log in to the control panel with an administrator-level account or above.
- Go to the Software configuration section.
- Select Git from the list.
- On the toolbar, click .
The git utility and the files of the cloned sites will remain unchanged.